• Skip to primary navigation
  • Skip to main content

Illuminations

  • Buying Guides
  • Styles & Trends
    • Bathroom Lights
    • Ceiling Fans
    • Ceiling Lights
    • Lamps
    • LED Lights
    • Outdoor Lights
    • Smart Lights
    • Wall Lights
  • Wellness & Safety
  • Shop Products

Informational

How to Safely Install a Ceiling Fan

How to Safely Install a Ceiling Fan

by admin · Mar 26, 2024

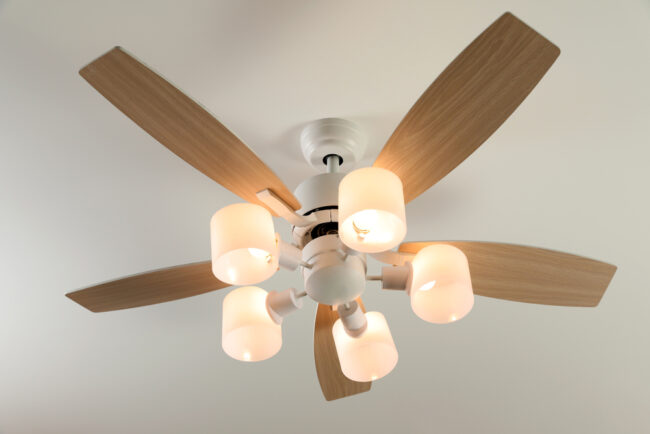
Installing a new ceiling fan is a cheap way to save on energy costs all year without compromising on comfort. In the summer, ceiling fans cool down the house by creating a breeze. In the winter, they help circulate the heated air to warm the whole room evenly. 

Putting in a ceiling fan is a win-win for your comfort levels and your budget – and it’s a pretty simple DIY project for homeowners. Plan on giving yourself a few hours (depending on the type of fan and your experience level with lighting DIYs), and grab a friend that can help you hold things in place while you work.

If you’re buying a ceiling fan new, it should come with thorough installation instructions. We always recommend following those instructions exactly to be sure that your fan is installed safely and properly. If you’re installing a secondhand fan, you may be able to find the installation guide online by searching with the model number on the fan. Either way, we’ll walk you through the basic steps here so that you can prepare. 

1. Preparation

Before you break out your tool belt, make sure you have a good plan in place. There’s nothing worse than being in the middle of a project and realizing you don’t have everything you need to complete the task.

Tool Checklist

Before you take on a ceiling fan installation project, make sure you have all the tools you need so you don’t have to rush off to your local hardware store for a last-minute purchase. To install a ceiling fan you’ll need to have a:

  • Voltage Tester
  • Ladder
  • Measuring Tape
  • Screwdriver
  • Ceiling Fan-Rated Junction Box
  • Fan Brace
  • Wire-Cutter/Stripper
  • Light Bulbs
  • Globes/Shades if they aren’t included
  • An extra-long downrod if you’re installing on a sloped ceiling
  • Ceiling Fan and Kit

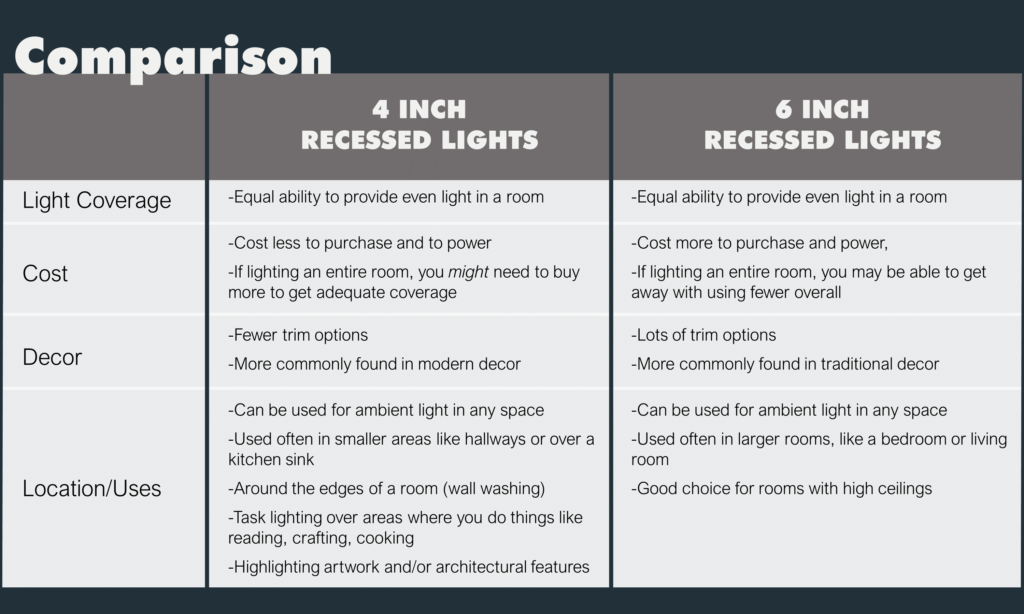
Choosing the Right Fan Size

Measure the room you’re working in before you start. Not all fans are created equal, so pick one that will fit. Use the following guidelines to help. 

  • For rooms smaller than 75 square feet (like bathrooms), pick a fan with blade spans of less than 36 inches.
  • Blade spans between 36 and 42 inches are ideal for rooms up to 144 square feet. 
  • A 44-inch span is perfect for rooms up to 225 square feet, like a dining room.
  • For rooms that are 225 square feet or larger (a large living room, for example), you’ll need a fan with a 50 to 54-inch blade span.
  • The more space between the ceiling and the fan, the better! The ideal ceiling fan height is 8-9 feet above the ground. 
  • If your ceiling is less than 8 feet, you’ll most likely need to install a flush-mount fan (no downrod).
  • High pitched ceilings typically require you to buy an extra-long downrod (so that the blades won’t hit the sloped ceiling), so check your ceiling height and angle before choosing your downrod.

Pro Tip: Once your fan is installed, the tips of the blades should be at least 30 inches from the walls, and the bottom edges of the blades should be at least 7 feet above the floor. 

Other Important Tips

  • Ceiling fans are heavy! They need to be anchored properly to an electric ceiling box designed to hold the weight of the fan. Inspect the electrical box to ensure it’s fan-rated. There should be an inscription on the box to indicate this. If it’s not, you’ll also need to purchase a fan box before you get started.
  • Check to make sure the light switch you’re using is wired appropriately for the fan. If it isn’t, you may need to call a professional to get the job done.
  • Check the ceiling joists for any wiring or plumbing pipes that may be in the way.
  • If you’re adding a new fan where one didn’t exist, check local building codes to determine if you need a permit.
  • Always check your installation guide for any additional requirements that are specific to your fan. For some expert help choosing the perfect fan for your space, give us a visit or a call and we’d be happy to help.

2. Safety

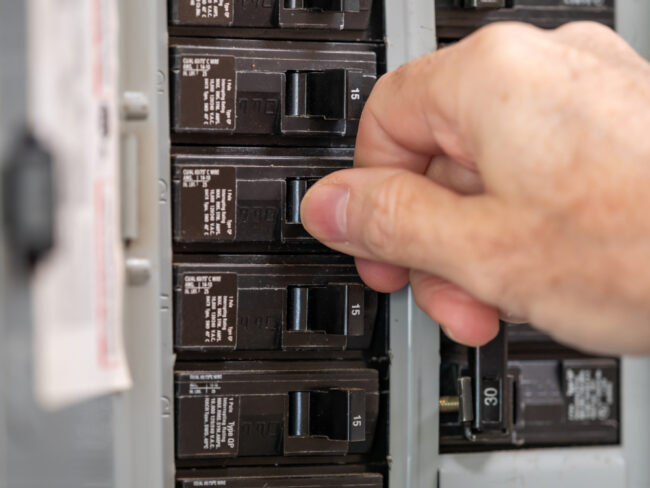
Now that you’re ready to begin, head out to your circuit breaker and turn the power off for the room where you’ll be installing your fan. Also, make sure all of the wall switches in the room are safely in the “off” position. Do not rely on a wall switch alone to protect you from electrical shock! Always use a voltage tester to be sure the power is off before handling wires.

Pro Tip: Place some electrical tape over the switches you’ve turned off on the circuit breaker. This will prevent anyone from switching it back on while you’re working.

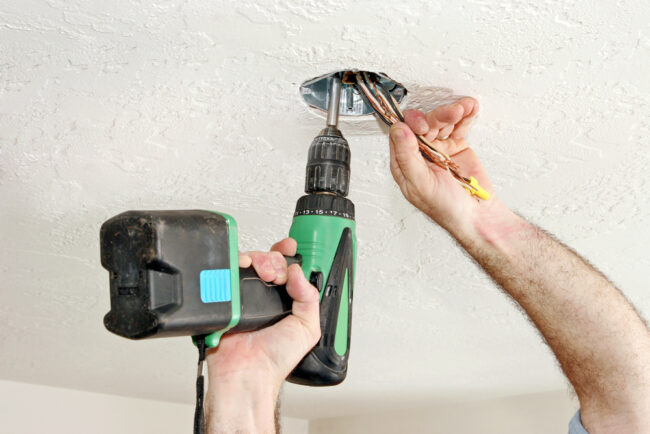
3. Remove Your Old Fixture

Let’s get started! First, you’ll need to take down the existing fixture. Most fixtures have easy-to-find attachment points, like screws or twist-off caps. Remove accessories like light bulbs, shades to get down to the base of your fixture, then unscrew the base from the ceiling.

If you’re removing an existing ceiling fan, remove the light bulbs and globes first. Then, take down the light kit (if needed – some fans have them, some don’t). Unscrew and remove the fan blades next. At this point, you may need to enlist a helper as the full weight of the fan base and motor can be heavy. Pull off the canopy (metal cover at the base of the fan). The last step is to remove the mounting bracket with a screwdriver!

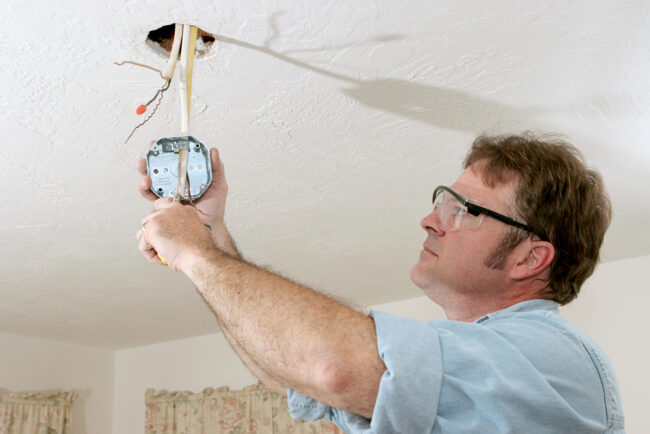
Once you have the base of your fixture dropped away from the ceiling, unscrew the wire nuts connecting it to the electrical box. Be sure to test the wires with your voltage tester first!

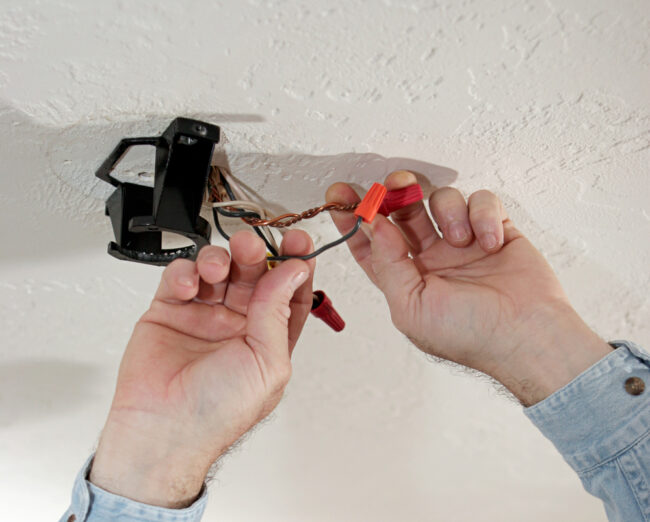
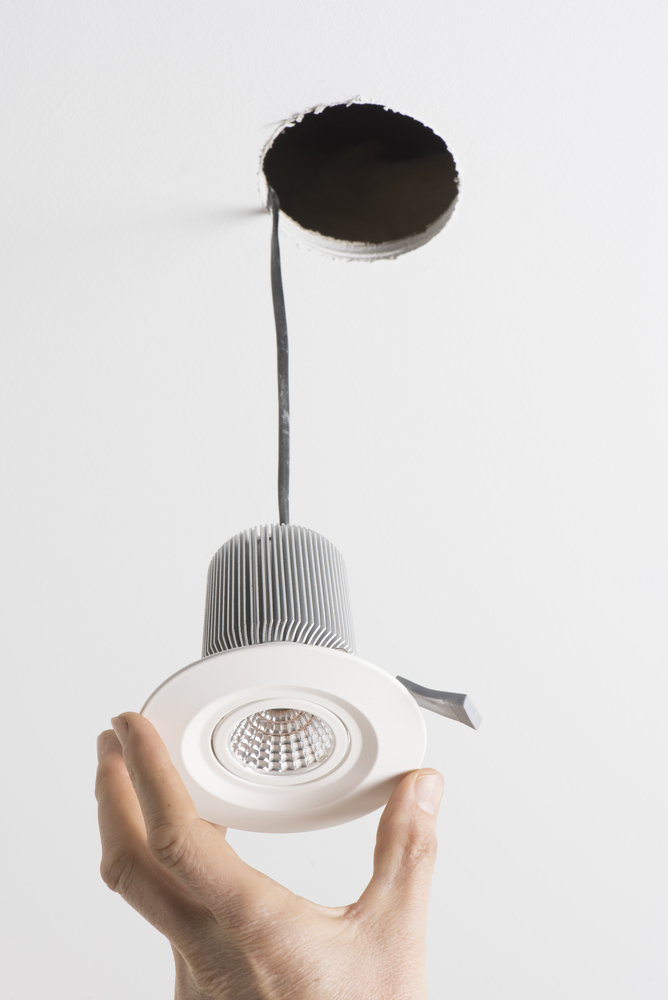
4. Install a Fan Box

Before you start, check your existing electrical box. If it isn’t rated to support the weight of your fan, you’ll need to install a new one. To see if your existing box is rated to hold a fan, just take a look at the label! If you can’t find a label, err on the side of caution and get a new one. 

You’ll have to do a little bit of homework here to figure out what will work best for your project. Fan boxes are easiest to install if you have open access, like in the attic or an unfinished ceiling. If you won’t have easy access you may need to widen your drywall hole a little, but you can usually find a brace that will slip through the existing hole. 

Take a look at your rafters to determine the best way to install your fan box. Fan boxes can be attached directly to the rafter with a side bracket. If your new fan won’t be right next to a rafter, look for a brace that will span the space between two rafters. These braces can be a little trickier to install through a small hole in the ceiling, but they’ll give you a lot more breathing room when it comes to getting your fan box in the right place. 

5. Install the Mounting Bracket

To secure the mounting bracket to the fan box, start by threading the wires through the mounting bracket. If the fan has a slide-on bracket, leave the bolts on the junction box, slide the bracket over the mounting hardware, and tighten the screws. For fans without a slide-on bracket, place the bracket over the mounting bolts that poke through the bracket. Then, secure it using the provided nuts. If your fan is a flush mount, pull the wiring through the canopy (the part that covers the wiring/mount bracket) and skip to step 7.

6. Install the Downrod

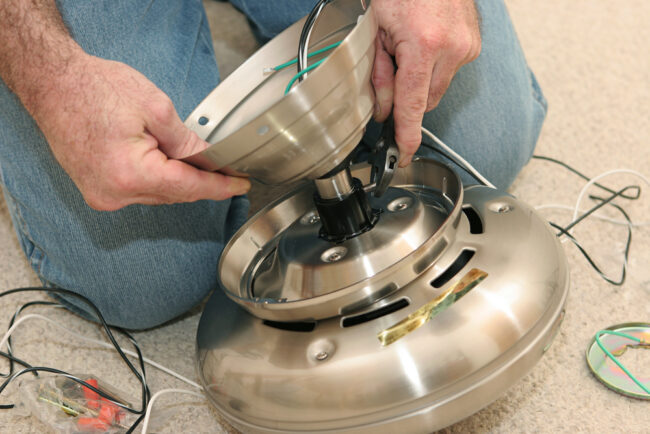
To set the downrod, you’ll want to find a flat work surface. Slip the canopy onto the downrod and pull the primary wires through the hollow downrod. Then, connect the downrod to the fan base. With the downrod and base assembled, attach the other end of the downrod to the mounting bracket. 

7. Wire the Fan

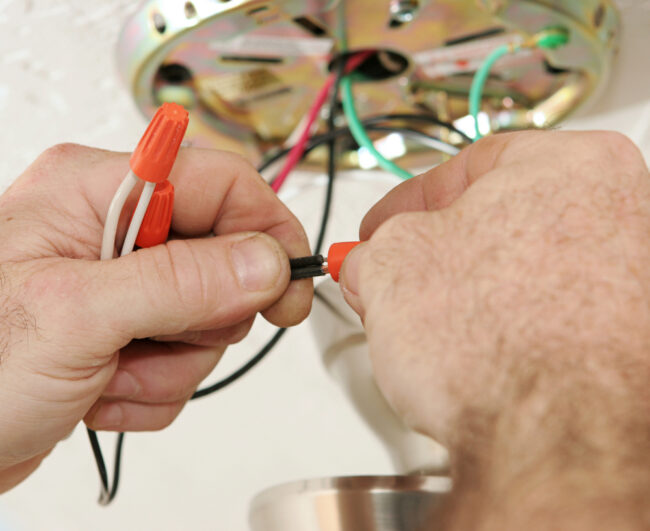
Next, it’s time to wire! Hang the downrod – or canopy, if you’re installing a flush mount fan – on the hook on the mounting bracket. If there isn’t a good place to hang it, phone a friend to hold the fan up for you to free up your hands while you connect the wires. 

Before you start, check to make sure all your wiring (and the wire nuts) will fit in the ceiling. Use your wire cutters to trim down any wires that won’t. This will also keep them from vibrating against the canopy when the fan is on. Use wire strippers to expose the copper of the wires on the new ends. 

Connect the corresponding wires using the provided wire nuts. Your installation guide will have a diagram to follow, but, generally speaking, the fan’s green wire connects to the ground wire, the fan’s black motor wire connects to the black supply wire, and the fan’s white wire connects to the white (or neutral) supply wire. 

Double-check your work against the diagram, then gently push the wires into the junction box. Lift the fan into position, then clip it to the mounting bracket and secure the screws.

Pro Tip: Some fans come with additional wires for extra features, like having a separate switch for the light and fan. If your switches or wires don’t match the diagram, you might need to check in with an electrician or a lighting specialist at our showroom to help you get things set up correctly.

8. Blades and Bulbs

Now it’s time to install the fan blades. Every fan is a little bit different – but most fans will have an arm or bracket that you’ll need to attach to the blade and then to the base using a screwdriver. Some fans have quick-install blades that speed up the process using keyhole slots that slip over the fan’s mounting screws and lock into place with a little tug. 

Some fans have reversible blades – so make sure you’re checking each time that you have the correct side pointed down!

By now, you should be seeing the light at the end of the tunnel – so let’s install the bulbs! For fans with a light kit, refer to your guide to ensure everything goes in place correctly. Generally, you’ll just need to install the shades, globes, or light cover. If your fan did not come with bulbs, make sure the bulbs you install have the correct base type and wattage 

If your fan came with a remote, don’t forget to install the remote control holder!

9. Lights… Fan… Action!

Last, but not least, it’s time to test out your new ceiling fan! Go back to your circuit breaker and turn the power back on. Try switching your fan and lights on and off using the light switch or remote control. Test all of the speed settings to make sure your fan is secured properly and doesn’t wobble or rattle.

Most of the time, installing a ceiling fan is a pretty straightforward DIY project. Occasionally, an odd issue can crop up due to things like old wiring. If you run into any trouble, be sure to give us a call right away, or call an electrician that can help you troubleshoot the issue.

—

Congratulations DIY master! Now that you’ve successfully installed your new ceiling fan, get ready for a fresh breeze to blow your way–and some savings too. With all that extra cash blowing around, come visit us and we’ll help get you started on your next project. 

—————————-

DISCLAIMER: Be sure to follow all the manufacturer’s installation instructions and take all recommended safety precautions. Check before installing to see if you need a permit and be sure all building and electrical codes are observed. If you have any questions or are unsure about installing the fan yourself, contact a licensed electrician or Illuminations for more help.

Filed Under: 2023, Ceiling Fans, Ceiling Lights, How to, Informational, Wellness & Safety

Lumens vs Watts: What’s the Difference?

Lumens vs Watts: What’s the Difference?

by admin · Mar 5, 2024

Light bulbs have been lighting up our world for over a hundred years, but do we really understand how they work? When you go to the store to buy a replacement bulb, the box labels are filled with numbers and industry terms that can leave you wondering how to know which bulb you actually need.

Fortunately, understanding the difference between lumens and watts is fairly straightforward. Take a quick minute to read this quick summary, and you’ll be ready to hit the stores to find exactly what you need.

Lumens

Lumens measure the amount of light a bulb emits. The technical definition is “the unit of luminous flux, equal to the luminous flux emitted in a unit solid angle by a point source of one candle intensity.” In less scientific terms, the higher the lumen rating, the brighter the bulb. Most mainstream bulb labels use the full term, but if you can’t find the word “lumens” on the label look for its abbreviation, lm.

How many lumens do I need?

Contrary to popular belief, you shouldn’t put the brightest bulbs you can find in every area of your home. The rooms in your home will all need different levels of light, depending on how you use them. Use bulbs with a high lumen count in areas where you need a much brighter light, like above your kitchen counters. You need much less light in your bedroom, so consider going with lower lumen count bulbs in warmer colors to keep it a relaxing space where you can get some sleep.

While there are complicated equations out there that you can use to calculate your “exact” lumen requirements, the trouble is that every person and every space is different. You may find that you prefer brighter lights than what’s “necessary” in one place and dimmer lights in another. Your best bet is to try a few different bulbs, or better yet – get a dimmer switch so that you can customize your light levels depending on your needs for the day.

Pro Tip: Lumens can be added across several light sources in a space. It’s not an exact science because it doesn’t take into account distance from the source and the angles of the light, but if you have three 800lm bulbs in a room, it will be lit with roughly 1800lm.

Watts

Watts measure the amount of power consumed by the bulb. One watt isn’t much, it’s equal to 1/746 horsepower. It’s named after James Watt, a Scottish inventor credited for creating a steam engine during the Industrial Revolution. The symbol for watts is “W”.

Most electrical devices are rated in watts, although large appliances that use more power are often measured in kilowatts, which is equal to one thousand watts. (1W = 1000kW)

The wattage of a bulb will tell you only how much power it consumes, not how bright it is. The lower the watt rating on the bulb, the cheaper it will be on your energy bill to light your house.

Before you buy, always check your light fixture for its watt rating. Never put a bulb with a higher watt rating than the fixture can handle. If the bulb tries to pull more power than the fixture can handle, it could start a fire.

 Energy-Efficient Bulbs

Before the days of LED bulbs, it was pretty easy to get a good idea of how bright a bulb was by simply looking at the wattage. The higher the watts, the brighter the bulb. LED lightbulbs can give off the same amount of light as a traditional bulb using far fewer watts. This is what the labels mean when they say the bulbs are “energy efficient” – they need less power to provide equivalent light.

TL;DR Lumens and Watts

Lumens and Watts both describe how a lightbulb works. Lumens measure the amount of light a bulb emits – the higher the lumens the brighter the bulb. Watts measure the amount of power a light bulb uses. Newer light bulbs like LEDs can produce a lot of light (lumens) using very little power (watts), making them more energy-efficient.

——–

Need help finding the right light bulb? Give the experts at Illuminations a call!

Filed Under: 2022, Energy, Energy Efficient Lighting, General Lighting Tips, Informational, Light Bulbs, Lighting Types

How to Choose the Right Recessed Lights for Your Home : An In-Depth Homeowners Guide

How to Choose the Right Recessed Lights for Your Home : An In-Depth Homeowners Guide

by admin · Feb 6, 2024

Recessed lights go by many names, such as downlights, pot lights, can lights, and puck lights. No matter the name, they all refer to light fixtures that are installed inside (recessed into) your ceiling. They shine light into the room without hanging down into the space like a chandelier or a flush mount fixture. 

There’s a lot to know about recessed lights before you install them in your home, but it can be hard to find all of the information you need in one place. So we’ve put together this handy guide with everything you need to know in one place to help you decide which recessed light is right for you!

Recessed Lights 101

Before we get into the nitty-gritty details, here’s a quick overview of some of the most important terms you need to know when shopping for recessed lighting.

Recessed Lighting Terms

There are three parts to a recessed light: the housing, the bulb, and the trim. The housing holds all of the wires and connectors inside a protective case that sits inside your ceiling, out of sight. The bulb is the part that gives off light. The trim is the visible portion of a recessed light that covers the housing and the hole in the ceiling, giving it a finished look. 

You’ll also need to pay attention to how widely the trim allows the light to shine – this is called the Beam Angle. Recessed light beam angles can range from a narrow 15-degree spotlight to a 120-degree floodlight. Generally speaking, anything from 60 to 120 degrees will work well for general lighting in your home.

Types of Recessed Lights

Traditional – These are the original recessed lights. They’ve been around the longest, but they have their pros and cons. They’re cheaper to purchase but more expensive to operate than LED options. They also produce heat, so you’ll need to be conscious of location.

LED – These newer recessed lights may cost more upfront, but they use considerably less power to run, which makes them cheaper to use. LED bulbs last for a very long time, so you won’t have to pay to replace them every year. They also produce minimal heat, making them a safer alternative to traditional lights. 

Ultra-Thin / Canless – These are a small subsection of LED recessed lights that have been designed specifically for use in remodels. The housing in these recessed lights is about as thick as drywall, so they’re much easier to install in an existing ceiling.

Ease of Install

If you’re replacing an old recessed light with a new one, installation is a pretty basic homeowner DIY. If you’re trying to add recessed lights where they weren’t before, that’s usually a much larger project. 

Recessed lights typically have a large housing, which means they need to be installed between the framing lumber in your ceiling. In new builds, this isn’t a problem because the spacing of your lights can be planned out during construction. If you’re installing recessed lights after the fact, creating an evenly spaced grid of lights can be a little bit more difficult. You’ll likely need to hire an electrician or contractor to help run the wiring correctly.

Canless lights are often the best choice for renovations because they can be installed almost anywhere in the ceiling. While easier to install, it’s still a pretty significant electrical project. If you’re comfortable with that type of DIY work you can give it a try, but most homeowners usually hire a professional.

Sizing

Homeowners are often surprised at the size of their recessed lights after they’ve been installed. It’s important to know that the measurement on the packaging of a recessed light refers to the size of the light’s housing, not to the size of the trim.

The measurement on the packaging tells you how large the hole will need to be in your ceiling so that you can plan out your spacing. You’ll also need to take into account the size of the trim.

Remember, the trim on a recessed light is there to cover the edges of the light and the hole, so it sits below the drywall and extends out from the fixture. Because trim styles vary, a 4” recessed light could appear 5, 6, or even 7 inches wide once installed.

Make sure you double-check that you measured the right part before you cut, or you could end up with a lot of drywall patching!

How to Choose the Right Size

Recessed lights come in a lot of different sizes, but the 6” size has been an unofficial industry standard for a long time. Now, with LED technology, manufacturers are finding ways to create the same amount of light in smaller packaging. Their smaller 4” counterparts pack a pretty big punch for their size, and they just might end up being a better fit for your space.

Light Coverage 

If you’re lighting an entire room with recessed lights, both 4” and 6” sizes will do the job well. They are pretty interchangeable as a general lighting option, but there are a few things to consider.

Ceiling Height: You’ll need to consider the height of your ceilings. Both 4” and 6” work well at standard ceiling height. For vaulted ceilings, you might want to consider sticking with larger lights with wide beam angles – the taller the ceiling, the more evenly diffused the light will be across your space. 

Existing Fixtures: If you’re adding recessed lights to work together with an existing light fixture like a chandelier or a ceiling fan, take stock of the way the existing fixture lights the space at different times throughout the day and at night. 6” recessed lights can help raise overall ambient light if the room is too dim. 4” lights are often a better choice if you need lighting around the dark edges of a room. 

How You Use the Room: The rooms in your home don’t need an equal amount of light in every square inch. Your rooms will feel better if the lighting is tailored to the way you use them. 

For example, this kitchen has beautiful pendant lights, but on their own they’d cast shadows onto the kitchen worksurfaces. This homeowner installed a row of recessed lights around the perimeter of the kitchen to provide better light on the countertop prep surfaces. In the dining area, a softer chandelier on a separate switch lights the table, which gives it a more comfortable, relaxing feel for when it’s time to eat.

Cost

4” lights are going to cost you less upfront simply because they’re smaller and cost less to make – although prices are going to vary based on materials, finishes, and special features. They also cost less to run because they use less power. 

6” lights may cost more, but (depending on the specific fixture) you may be able to use fewer 6” lights to achieve the same coverage as a larger number of 4” lights. 

If you’re on a tight budget, you’ll want to map out your room with both sizes and then run the numbers both ways to make sure you’re getting the best deal. 

Decor

For years now, homeowners have been ditching ceiling lights in favor of a grid of recessed lights. But, the lack of visual interest is starting to sway designers back towards beautiful statement ceiling light fixtures like chandeliers and pendants. 

In rooms where modern statement fixtures are providing most of the ambient light for space, larger recessed lights aren’t really necessary. 4” lights are a much better option for creating beautiful layers of light without over-lighting your space. You’ll find this size most often in rooms with a modern design.

You’ll find 6” lights most often in large open rooms that need a lot of light, and in rooms with more traditional decor. 

Because 6” lights are more common, they currently have more trim styles available. If you have a specific style of trim in mind, make sure you find out if it’s available in the size you want before you buy!

Location/Uses

4” recessed lights are most commonly used in smaller spaces like hallways, home offices, and over the kitchen sink. They’re perfect for lighting a reading or craft area where you want to see what you’re doing. They’re also a great size for highlighting artwork or architectural features without washing them out. 

6” lights do their best work lighting a large room like a living room or dining room. They’re also a great choice for rooms with high ceilings, as their larger size will help to spread the light more uniformly throughout the space.

Properly placed recessed lights can make your rooms feel bigger if you employ a technique called Wall Washing. Wrapping your room in 4” recessed lights will evenly coat the wall with light, making the entire space feel more spacious. This is a great trick for smaller spaces like hallways and narrow rooms, and it helps to hide imperfections in the wall finish. 

Placement is important here – if your recessed lights are installed too close to the wall, they’ll create a cone of light (called wall grazing) which will not have the same space-creating effect. The goal is to get soft, even coverage across the wall without any harsh lines.

Overview

To sum it all up, here’s a handy comparison between 4” and 6” recessed lights. 

Other Things to Consider

The size you choose matters, but there are other things you need to consider before purchasing! LED recessed lighting has come a long way in the past few years, and new features are regularly being added to the lineup.

Color

LED lights come in a wide variety of colors, measured in Kelvins (K). 

Warm light (up to 3000K) appears orange or yellow, like the light from traditional incandescent bulbs. It feels soft and cozy, and is a great choice for places where you want to wind down and relax, like a bedroom or a living room. 

Daylight light (between 3000K – 4000K) is similar to the light at midday. It feels bright and white, and is a great choice for most rooms in the house. 

Cool light (above 4000K) starts to appear blue as the Kelvins increase. Blue light feels crisp and energetic and is often used in offices and hospitals to help keep people alert. Be careful with blue light in your home – it can keep you up at night! 

The color you choose for your lights will change how the paint on your walls looks, so it’s a good idea to experiment with it first before you commit. 

Color Changing lights – Some LED lights are color-changing, meaning they can be set to emit warm or cool light, which takes the stress out of worrying which temperature to choose. Some lights can be changed with a switch in the housing, which is great for homeowners that want to choose what they like, set it, and forget about it. Others can be changed with a remote control or a smart hub, making the lighting in your house truly customizable to any activity.

Dimmable

We recommend installing LED lights on a dimmer switch whenever possible! Because they are so bright, it’s nice to be able to dim the lights to a level that you’re comfortable with throughout the day. Most LED lights are already dimmable, but some aren’t, so you’ll need to double-check before purchasing if this is a feature you want in your home!

Smart Technology

Smart LED recessed lights come with the ability to communicate with other technologies in your home, like a smart hub. Depending on the features, this means you could set your lights on a schedule or even turn them on with a voice command instead of a switch. 

There are a lot of things to consider when you’re installing recessed lights. Our lighting experts know all of the ins and outs and would love to share their knowledge with you to help get you started. Give us a call or stop by our showroom and see for yourself how recessed lighting can completely transform your home.

Filed Under: 2022, How to, Informational, Recessed Lighting

Chandeliers vs. Pendant Lights: What’s the Difference?

Chandeliers vs. Pendant Lights: What’s the Difference?

by admin · Nov 21, 2023

Chandeliers and pendant lights both make a statement in any space. Because they’re very similar, they are often confused for one another. While they both hang down from the ceiling, there are a few key differences you need to know that can help you choose what’s best for your home.


Chandelier

A chandelier has a central body with multiple lighted branching arms. It usually hangs suspended from a chain.


Pendant Light


A pendant light has a cord or chain with one light attached. Sometimes pendant lights have multiple lights, but if they do, they’re usually surrounded by a structure 

like the one pictured above.


Similarities and Differences

Style

The biggest difference between a chandelier and a pendant light is how it looks. Chandeliers are more intricate and ornate. They make a big statement and add elegance to a room. Chandeliers will be the center of attention. Pendant lights come in a wide variety of shapes and styles. When compared to a chandelier, pendants are usually smaller and have a cleaner, more minimal feel.

Use

Chandeliers and Pendants can both be used in any room in the house! Chandeliers are usually used to provide ambient light (illuminates a space evenly) in large spaces, but their ornate designs can create shadows. Because there are many lights on one chandelier, you may only need one to illuminate a whole room. Pendant lights are better for direct lighting (over a kitchen table, for example). Since there’s usually only one bulb per fixture, smaller pendant lights are often used in groups, like a set of 3 over a kitchen island.

Cost

While there are exceptions, chandeliers tend to be much more expensive than pendant lights. Chandeliers also often require professional installation due to their size and weight, which may add extra to your total bill. On the flip side, a handy homeowner can sometimes hang a pendant light by themself! If you’re comparison shopping, don’t forget to consider the number of fixtures you’ll need when calculating cost.

Maintenance

When choosing between these two statement fixtures, be sure to consider maintenance. Since pendant lights are simpler, they are usually easier to clean and have simpler lightbulb changes. On the other hand, chandeliers can be more challenging to maintain because of their delicate design. If you’re looking for easier maintenance, a pendant light is your best bet.


Pros and Cons

Chandeliers and pendant lights are both great options, but to help you make up your mind, we rounded up all of the details above here as some quick-reference pros and cons.

No matter which you choose, chandeliers and pendant lights will both make a statement and show off your style! If you’re still not sure which is right for you, give our experts at Illuminations a call for personalized advice!


Filed Under: 2022, Informational

A Guide to the Basic Types of Light and How to Use Them In Your Home

A Guide to the Basic Types of Light and How to Use Them In Your Home

by admin · Nov 14, 2023

Light is all around us, controls what we do and how our body runs. Yet, most people haven’t given much thought to the kinds of light that surround them. In this article, we’ll cover the basics of both as we explain how to use light to your advantage.

Types of Light in Interior Design

When we talk about interior design, there are a lot of different words that get tossed around about lighting. It can get a little confusing, but the good news is, if you can get down these main types of light you’ll be 90% good to go! 

  • General/Ambient: This is the main source of light for a space. It fills the room with bright, balanced, even light. This usually comes from an overhead fixture centered in the room or an array of recessed lights.
  • Task: Task lighting is usually bright and used in combination with ambient light. It’s extra light that is strategically placed to add focused light to a workspace, like a kitchen counter or writing desk.
  • Accent: Accent light refers to light that is more about design than function. Spotlights, track lights, and strip LEDs can fall into this category. They often shine on artwork or architectural features like high ceilings or feature fireplaces. Although accent light does fill a function, the main value is decorative.
  • Mood: Mood lighting is generally soft, dim light. It encourages a calm or romantic atmosphere. Most often this is done with lamps, candles, or lights on dimmer switches.

When designing a lighting plan for your home, it’s important to create “layers” of light by including several types of lighting in each space. To see this in action, here’s a breakdown of the types of light found in this bedroom:

  • General/Ambient: Array of recessed lights along the ceiling
  • Task: Reading lamps on either side of the bed
  • Accent: LED light strip tucked around the edges of a coved ceiling, recessed lights shining on wall panel details, decorative sconces on wall centered around the dresser
  • Mood: Soft lights under closet doors, dimmer switches on several fixtures

This room is a great example of the way layered light adds to the design of a space without being overwhelming. Remember, you won’t usually be using all of these lights at the same time – but having options lets you customize the space for, however, you need to use it at the moment.

Other Types of Light

For most of your home projects, understanding the main types of lighting should be sufficient, but there are a few other lighting terms you may hear. Here are a few of the most popular terms: 

Diffused Light

Properties: Gentle, encourages relaxation

Best locations: Bedrooms, tub, Living Room, Dining Room

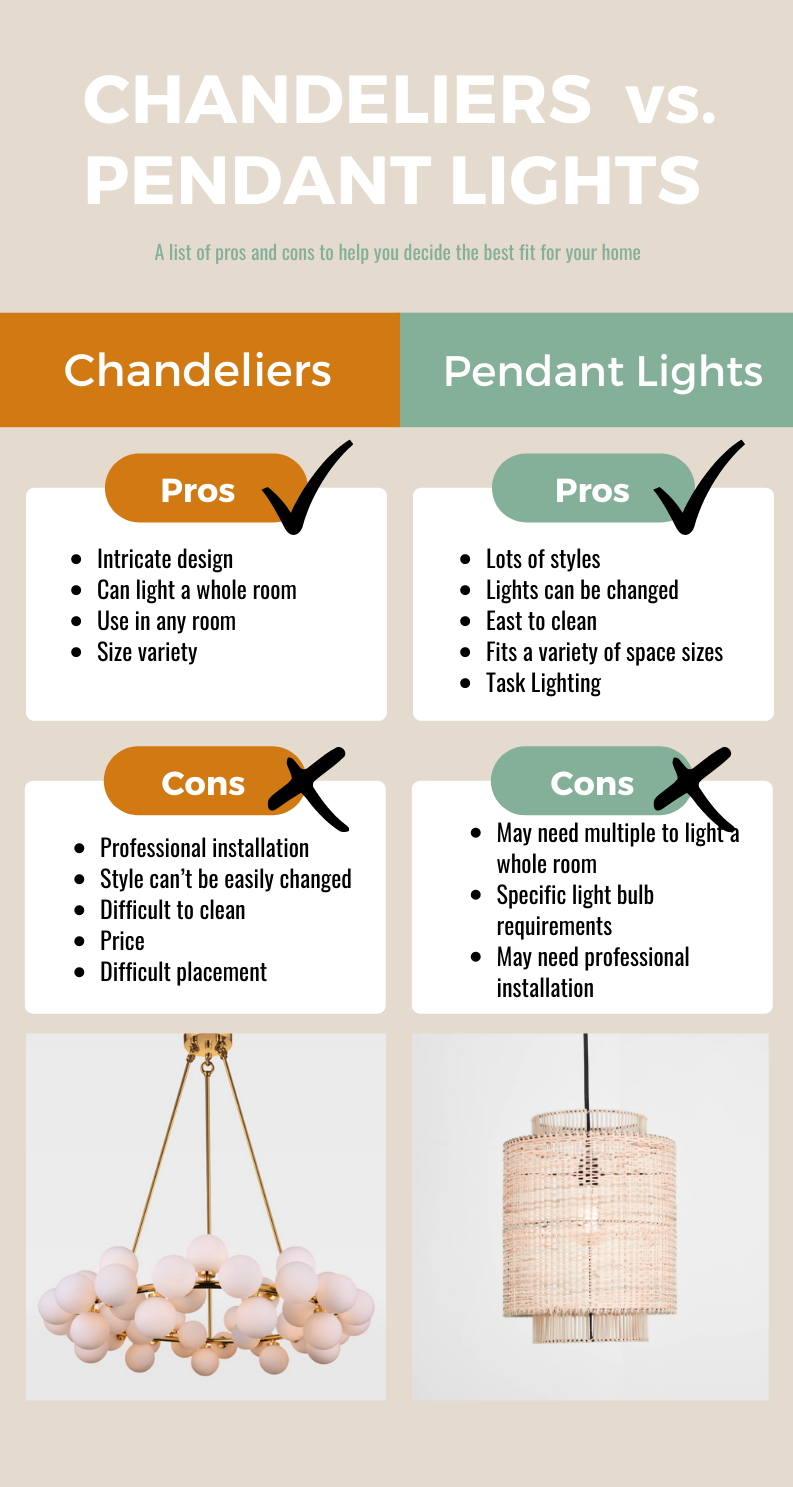
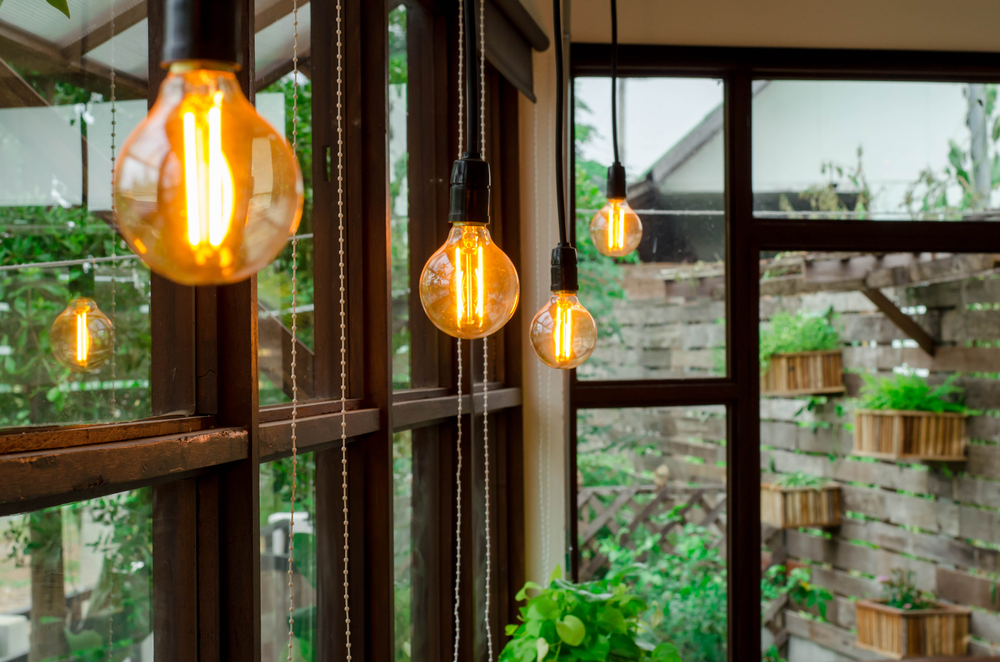
Diffused light is a natural companion to warm light. This term refers to light that is scattered and doesn’t cast a hard shadow. You can create this effect through reflected or covered lighting. We’ll focus on the latter here and touch more on reflected light in the next section.

Breaking up light makes it less harsh and more relaxed, cozy. Popular design elements are boho wicker chandeliers, modern plastic-covered lights, or paper lanterns. Both allow for plenty of light but filter the harshness of the bulb.

The opposite of diffused light is hard light. This light shines directly from the source and casts a hard shadow. This light is often found in workspaces like the kitchen or office. 

Reflected Light

Properties: Gentle, amplifies space

Best locations: Kitchen, Living Rooms, Bedrooms

This term has more to do with how light reacts in a design after it hits a surface in your home than with the source of the light. There are a few things that will affect how the light hits, and bounces off, the objects in your home. 

Color

Light colors reflect light, and dark colors absorb light. You can make a room feel big and spacious with just a coat of light-colored paint on the walls and ceiling. If you go dark on your walls, you’ll often need to add additional light sources to keep your room from feeling small.

Finish

Smooth, glossy finishes like wood floors or metallic furniture will reflect light and bounce it back out into the room. Interiors with lots of glossy surfaces can get away with fewer light sources. If your room feels a little too bright – try adding in some softer, textured surfaces like a fabric sofa, a rug, pillows and blankets, or textured wall art. 

Backlight

Properties: Highlights design, provides contrast, decreases eye strain

Best locations: Closets, Bookshelves, Cove ceilings, Wall panels, Kitchen cabinets, TVs and Computer Screens

Backlighting is the practice of lighting an object from behind. With a soft light source behind it, your bed, tv, art, or mirror will look like it’s glowing. In interior design, backlighting can also refer to the practice of lighting a wall, floor, or other surfaces with soft light (as seen above) to give the illusion of continuous, shadow-free illumination. 

As A Design Element

The key to successful backlighting is to tuck the light sources out of view and in reflective areas. In interior design, backlighting is usually found tucked into the recesses of architectural details like cove ceilings or wall panels, or around cabinets, bookshelves, and closets.

Behind Screens

Another common use for backlighting has a little less to do with design and more to do with function. Running a strip of LED lights along the back of a TV screen or computer monitor creates a soft glow around the edges of the screen, which reduces the strain on your eyes. Light used in this context is also often called bias lighting.

Light Temperature

The temperature of light refers to its energy and wavelength. Higher energy light can appear blue and is called cool. Lower energy light appears yellow or red and is called warm. The temperature of the bulbs you put in your light fixtures can actually impact how you feel while you’re in the space, and can even affect your sleeping patterns.  

Traditional incandescent bulbs only gave off warm light, so there was little variety in the light temperature of interior light fixtures. But LED technology has created light bulbs that can give off any wavelength from cool to warm, and some bulbs can change color with the click of a button on a remote. 

Homeowners now have a much wider range of color temperatures to choose from – so it’s important to understand how these light temperatures affect you when you’re lighting your home.

Cool Light

Properties: Alertness, attention, working brain

Best Locations: Office, Kitchen, Vanity, Bathroom Mirror

Blue light is receiving a lot of negative attention these days, but it’s not all bad. Blue light is a very important part of both our daily cycle and our workday.

The biggest source of blue light is the sun. The blue spectrum of light activates our attentive brain, which helps to keep us alert.

Since blue light is excellent for concentration, it is perfect for work areas. The kitchen, home offices, homework areas, and around mirrors are perfect locations. It’s often used for general lighting and task lighting. Cool lights allow the whole family to focus up and get great work done. 

Because cool light keeps your brain alert, it’s best to turn off all blue light sources 2 hours before bed. That includes your phone screens and TVs – if you’re not getting great sleep at night, try changing your relationship with blue light. It can make a big difference! 

Warm Light

Properties: Relaxation, sleep, resting brain

Best Locations: Bedrooms, Living Room, Dining Room, Bathtub

This light has a longer wavelength, travels more slowly, and outputs less energy.  Warm light signals our brains to relax and encourages rest and sleep. 

Fire, such as from a candle or fireplace, is a natural source of red light. Sitting around a fire at night to feel cozy or romantic isn’t an arbitrary human idea – it’s biology!

Warm light sources are perfect for bedrooms, tub areas, living rooms, or dining areas. Ending your day in warm light will help your body to relax and get ready for excellent, restorative sleep.

Natural/Neutral Light

Properties: In between warm and cool light, bright but not harsh

Best locations: Substitute for cool light for sensitive eyes

There is a third bulb temperature marketed today. Natural or neutral bulbs give off light in between cool and warm. These bulbs may be particularly useful for those with light sensitivity problems. These bulbs are bright enough to fill ambient lighting needs to work in without feeling harsh. 

Ask the Pros

It can feel intimidating to design the light of your home. The lighting pros at LitLiving are available to help you combine your aesthetic, room needs, and budget as they connect you with the best lighting showrooms around.


Filed Under: 2022, Informational

Lighting Your Home: A Beginner’s Guide to Light Fixtures

Lighting Your Home: A Beginner’s Guide to Light Fixtures

by admin · Oct 17, 2023

Overearth/Shutterstock.com

It’s easy to tell which light fixtures you love when you’re scrolling through designer home pictures on your phone. But when it comes to finding a light for your own home, the little details and product specs can almost feel like they’re written in a foreign language. What’s an accent light? Is that a pendant or a chandelier? What is that light called? I don’t know what to search for!  

If this sounds familiar, we have good news: we’ve done all the research for you! Put down your search engine, and bookmark this page. This light fixtures cheat sheet has everything you need to know to get started lighting your home, your way.

Lighting Basics

Vectorium/Shutterstock.com

Not all light sources are created equal! Before you dive into pendants and sconces, you need to know the three basic types of lighting.  

Ambient Lighting: The primary source of light in a room, also called “general lighting”. 

Example: A ceiling fixture provides ambient light, meaning it lights the whole room. If your whole room is too bright or too dark, addressing the ambient light should be your first step.

Accent Lighting: Supplemental lights used to light dark corners or to highlight a room’s focal point.

Example: A floor lamp added to a dark corner gives the room more even light. A wall sconce or track lighting highlighting a fireplace or bookshelf makes it a focal point in the room.

Task Lighting: Specific lighting designed to make doing a certain task easier. 

Example: Any light that is used to complete a task fits here. At home, this includes things like a reading lamp, a utility light over a garage workbench, under-cabinet lights above the kitchen counter, and desk lamps.

Before you even start looking at light fixtures, take a look at your space. Turn on the lights in your room during the day and again at night. Look for the places where the light is too bright or too dim. Then, determine which type of lighting you need to use to fix those places. 

Light Layering

Maryna Rodyukova/Shutterstock.com

We know it’s tempting to just install that fancy ceiling fixture you found on sale and call it a day, but your room just won’t feel right if you’re only considering one light source. 

What is Light Layering?

Light layering is the practice of combining different types of lighting to create a mood. It’s an important part of your home design! Layered light sources, like a ceiling fixture and a floor lamp, work together to fill in dark corners and highlight a room’s best features, giving it the perfect ambiance.

Expert designers spend hours on this to get it just right, but you don’t have to dive that deep. Just make sure you have a combination of ambient, accent, and task lighting in your space and you’ll be on your way to a balanced design. Remember, natural light counts as a light source too! 

Light layers done right will smoothly transition a room through the day. They can transform a living room from a bright, daytime work area to a warm, cozy entertaining space with just a few well-placed fixtures.

Smart Home Lighting

Babayev_Design/Shutterstock.com

Smart technology makes light layering easier than it’s ever been! Smart bulbs and plugs make it so that you can turn on any light in the house from one place. You can set up different lighting profiles for things like work, dinner, and movie nights. You can even put your lights on a schedule so that they follow you through your day without any button pushing.

When you’re ready to start shopping for light fixtures, look for ways you can mix it up with new light sources. Choose light fixtures that work together to create the perfect ambiance and layer your room with light.

Light Fixtures

Marta Sher/Shutterstock.com

Light fixtures come in a huge variety of shapes, colors, and styles. It’s easy to get lost in the lingo, so here’s a quick breakdown:

Pendants

These lights are suspended from the ceiling and shine light downwards. They’re typically used as task lighting over kitchen bars and tables, or in the bedroom to replace bedside table lamps. They also are a great choice for accent lighting that makes a statement. You might need an electrician to install them for you if you don’t already have wiring in your ceiling.

Flush Mounts 

These lights are mounted directly to the ceiling, with no hanging bar. The top of this light sits flush with the ceiling, giving it its name. Flush mount lights are one of the most common types of ambient lighting. They come in many varieties and sizes, so you’ll need to check to make sure it will provide enough light for your space.

Sconces

Sconces are mounted to the wall instead of the ceiling. Some cast light directionally along the wall, shining up, down, or to the side. Other sconces broadcast light in all directions. These lights are used for both accent and task lighting. Sconces can be installed almost anywhere, but they’re most commonly used as vanity lighting above a bathroom mirror, or as exterior lights on homes and businesses.

Lamps

Lamps are freestanding light fixtures that typically need to be plugged into an outlet. They can be used for ambient, accent, and task lighting, and they’re easy to move around a space. This versatility makes them one of the most DIY-friendly lighting upgrades! Desk lamps are used as task lighting for things like writing at a desk or reading a sheet of music. Table lamps are used as accent lighting, usually placed on an end table. Floor lamps are the largest, typically 58” – 64” tall, and can be used as any type of lighting, depending on its location, style, and brightness.

Chandeliers

These lights are the showstoppers of the lighting world. They are suspended from the ceiling and are usually a focal point of a room’s design. Chandeliers emit light upwards to reflect ambient light around a room. They’re most often found in entryways and over dining tables, but they can be added to any space to add an elevated sense of style. 

Ceiling Fans

This fixture is designed with airflow in mind.  Ceiling fans can come with or without a light kit, so you can decide what’s right for your space. With a light kit, they provide ambient light in a room. They come in different sizes to accommodate different room sizes, so you’ll need to measure your room before you start shopping.

Track Lights

Track lighting is a unique type of lighting with an industrial feel and a flexible format. It’s made up of two parts: a long track attached to the ceiling, and lights attached to the track. The light heads can be moved to any position on the track, and tilted to point in any direction. Track lighting works well as accent or task lighting to highlight artwork or to illuminate a work surface. It’s also used as ambient lighting in some modern minimalist spaces.

Recessed Lights

Also called can lights, recessed lights are mounted inside the ceiling for a seamless, streamlined look. Recessed lights are often installed in large rooms to increase the ambient light without drawing attention away from the main light fixture. Some are directional and can be pointed towards a feature wall or workspace for accent or task light. They’re also very popular in basements with low ceilings, because they provide light without hanging down into the room.

Under-Cabinet Lights

This type of lighting is designed to be invisible. It comes in a wide variety of styles, from battery-powered stick-on lights to hardwired LED light strips. They’re installed on the underside of a kitchen cabinet, out of view, to provide task lighting for cooking. Alternatively, you can install them on the toe kick of lower cabinets to light the edges of your floor.

Topconcept/Shutterstock.com

You’ve got this handled. Now you’re ready to go and make your space brighter and better!

We wish you the best and brightest of luck with your next lighting project! If we didn’t cover your question here, or if you need any help picking out a fixture that’s just right for you, don’t be afraid to give Illuminations a call! We’ve got you covered.

Filed Under: 2021, Informational

Are LED Lights Safe?

Are LED Lights Safe?

by admin · Aug 22, 2023

How LED Lights Might Be Unexpectedly Affecting Your Health

Wanpatsorn/Shutterstock.com

LED light bulbs are touted as the latest and greatest thing in the lighting world, and for good reason! They’re brighter, more efficient,  and more colorful than lightbulbs of the past. But are they safe?

LED technology is still relatively new, so scientists and health professionals are still studying the impact LED light has on our health. So far the results are a mixed bag, with some good news and some bad news. 

If you’re one of the many homeowners that filled your house with LED bulbs to save on energy bills, you might be wondering who to listen to and how concerned you should be. So, before you go through your house with a ladder and a trash can, stick around and we’ll break down what we know so far. 

The Basics

Before we can get into the side effects of LED lights, we need to cover a couple of lighting basics. 

Designua/Shutterstock.com

Light travels in wavelengths, and the length of the light wave changes its visible color. While infrared and UV light are invisible, the wavelengths in between can be seen by the human eye.

LED lightbulbs come in light colors all along this visible spectrum, and we use Kelvins to measure their “warmth”. Warm lights give off a yellow glow that feels cozy and relaxing. On the other end of the spectrum, cool lights give off a blue light that feels crisp and energizing. 

Suriya KK/Shutterstock.com

Blue Light Health Risks

DKai/Shutterstock.com

You may be asking yourself, what does this have to do with my health? As it turns out, the color of the LED light changes how it affects your body. Red and Near-Infrared (NIR) light is thought to stimulate repair and regeneration in our bodies. Blue light is a little more complicated. 

Blue LED light (also called cool white) mimics daylight, which makes it popular in spaces like offices where you need to stay alert, and kitchens where bright lighting is important for safety. But some scientists are raising concerns about the side effects of prolonged or intense exposure to this blue light, and have linked it to sleep disorders, migraines, eye damage, and even breast cancer.

The research is still new and ongoing, so it can be hard to find answers. We’ve put together an overview of the current health risks associated with LED light so that you can see it all in one place and decide for yourself what you want to do.

LED Lights and Sleep

Microgen/Shutterstock.com

If you find yourself getting tired around the same time every day, it’s by design. When it gets dark outside, our bodies start to produce melatonin, which helps us to relax and drift off to sleep. This process is part of a cycle called the “circadian rhythm”. 

When our circadian rhythm gets thrown off, it can cause all sorts of health issues including diabetes and heart disease. The WHO even classified night shift work as a probable carcinogen in 2007 due to the disruption of shift workers’ circadian rhythms. 

Blue LED light can have a devastating effect on our circadian rhythms too. A Harvard study found that exposure to blue light reduces melatonin production for as long as 3 hours. Without the melatonin to trigger sleep, people exposed to blue light have a harder time getting to sleep at night. 

This blue light can come from any blue LED light, including your interior lights, your TV, and your cell phone or computer screen. So if you’re having a hard time getting to sleep at night, try unplugging a couple of hours before bed. Turn off your devices, and only use warm interior lights when possible.

LED Lights and Eye Damage

Myboys.me/Shutterstock.com

LED computer monitors emit blue light that can strain your eyes with extended use. (This happens with LCD monitors as well.) If you find your eyes feeling tired after a day at the office, there’s an easy solution recommended by the AAO that may help: The 20-20-20 Rule. “Every 20 minutes, shift your eyes to look at an object at least 20 feet away, for at least 20 seconds” to help prevent eye strain.

It’s also possible that blue LED lights could be causing permanent damage to your eyes. In 2019, a French study showed “show short-term phototoxic effects” in the eye with short exposure to blue LED light. Even more concerning was that they discovered long-term damage in eyes that had regular exposure to blue light. 

This eye damage can increase the risk of developing macular degeneration, which is a progressive loss of vision over time. If you have a family history of macular degeneration, it might be a good idea for you to ask your doctor about limiting your exposure to blue LED light. In the meantime, you can swap out your cool LEDs for soft white, and look into buying some blue-light-filtering specialty lenses. 

There was some good news too- they found that this damage seems to be limited to just blue LED light. Warmer, soft white LED lights appeared to be just as safe as other traditional light bulbs.

LED Lights and Migraines 

fizkes/Shutterstock.com

Exposure to artificial lights is linked to higher rates of headache and migraine symptoms. We still don’t know exactly why, but researchers have a few ideas. 

One theory is that flickering is to blame. If you’ve ever worked in an office with fluorescent lights, you’ve probably experienced at least one headache because of the fluctuation in the light they emit. 

Scientific American conducted a study where they looked at workers in offices with flickering fluorescent lights and workers in offices with non-flickering lights. They found that office workers working under flickering lights were twice as likely to experience headaches than their counterparts. 

We haven’t seen any studies like this done yet for LED lights, but there are some possible repercussions for migraine sufferers. LED lights also flicker, although it’s too fast for us to perceive it. This could mean that they are a better option for migraine sufferers. On the other hand, fluorescent bulbs dim 35% when flickering, and LED lights dim all the way to 100%. It’s possible that the bigger change in light levels when flickering could make LEDs even more likely to cause headaches. It’s important to pay attention to the types of light you’re exposed to before a migraine to find out what your triggers are.

Another theory about light and headaches is that the intensity of LED lights can be a migraine trigger. Dimmable LED lights could be a solution for migraine sufferers who find the lights in their home to be too bright.

Although research linking LED lights to migraines is still pretty hard to come by, you’ll see more information in the near future. One clinical trial is testing green LED light, as it appears to reduce migraine symptoms.

LED Lights and Cancer Research

Lab Photo/Shutterstock.com

In 2018, researchers in Spain discovered a link between exposure to outdoor blue light at night and certain types of cancers. They found that participants with a high estimated exposure to blue light outside at night had a 60% higher risk for developing breast or prostate cancer.

It’s important to note that this study only looked at the effects of high levels of exposure to outdoor blue light at night. They did not study the more typical blue light given off by indoor lights or device screens.

While this may sound alarming, it’s still too early to raise red flags just yet. This research is brand new and unproven outside of this single study. If you’re concerned, the best thing to do for now is to limit the time you spend outside under artificial lights, and to close your curtains or blinds at night if you have a blue LED streetlight nearby.

It’s Not All Bad News

LEDs have only been around since the 1960s, and blue LED lights weren’t developed until the 1990s, so there’s still a lot to learn about them! We’re learning that blue LED light may have some unexpected negative side effects, but that doesn’t mean that all LED light is bad. 

LED Light Therapy is a new field that uses LED lights to treat conditions and heal wounds. LEDs lights can improve skincare, help with mood disorders, and have the potential to do more!

LED Light Therapy and Seasonal Depression

Image Point Fr/Shutterstock.com

Seasonal Affective Disorder (SAD) is a mood disorder that affects an estimated 10 million Americans. As the days get shorter and sunlight is harder to find, many people find that their mood starts drop and seasonal depression sets in. 

One of the ways doctors treat this is with LED light therapy boxes. These super-bright boxes of light have rows of LED lights that researchers believe cause a chemical change in the brain that lifts your mood when you sit in front of them for 20-30 minutes a day. For a light therapy box to be effective, it needs to be rated at 10,000 lux or higher, so be careful to avoid cheap knock-offs when shopping for them online. 

If you find yourself struggling in the winter months, make sure you talk to your doctor. Light therapy boxes are only one part of an effective treatment plan for SAD, and they don’t work for everyone. You don’t have to struggle through the winter months.

LED Light Therapy and Skincare

Puhhha/Shutterstock.com

In the 1990s U.S. Navy SEALs started developing LED light therapy technology to help heal wounds more quickly. Once it was proven effective, doctors and aestheticians started using LED lights in skincare. 

Red LED lights are used to reduce the appearance of acne, wrinkle and age spots. It’s thought to reduce inflammation and stimulate collagen, which causes skin to appear more smooth.

Blue LED lights are used to treat surface and cystic acne. It’s believed to make oil glands less active, and kill bacteria beneath the skin. 

So, are LED lights bad for you?

LED lights as a whole are very safe, but you do need to be careful about how you use them. 

Use soft white lights where you can in your home, especially in your bedroom. It’s still okay to use blue LED lights (often called Daylight bulbs) in your home, especially in places where you need to work, like an office or kitchen. Just keep in mind that these blue lights can affect your sleep, so steer clear of them in the late evening hours.

If you’re prone to headaches or migraines, pay attention to the lighting you’ve been exposed to. If you notice a pattern, changing out your lightbulbs could be an easy fix! Consider getting blue-light-filtering glasses to help protect your eyes if you work in front of a computer screen all day. Just like taking a multivitamin every day can help keep us healthy, small precautionary measures against harmful light sources may make a big difference. 

TL;DR – LED Lights and Your Health

RisksBenefitsMixed Bag
Sleep – Exposure to blue LED light before bed can disrupt your circadian rhythm. You should limit blue light exposure for a few hours before bed.

Eyes – Blue LED light can damage your eyes. Blue light filtering glasses are recommended for people that work in front of a computer monitor all day.

Cancer – The link between LED light and cancer is still being studied. Some researchers believe it increases the risk of developing certain types of cancer, but more research needs to be done.
Seasonal Depression – LED light therapy boxes can help some people that suffer from seasonal depression, although they are just one part of an effective treatment plan. Please talk with your doctor if you think you may have SAD.

Skincare – LED light therapy can help speed up the healing process. Red LED lights help reduce the appearance of acne, wrinkle and age spots. Blue LED lights are used to treat surface and cystic acne.


Migraines – Flickering lights can trigger migraines for some people. LED lights flicker significantly less than fluorescent lights, so some migraine sufferers will benefit from replacing CFL bulbs with LED. 

LED lights are also very intense, which could also be a migraine trigger. Most LED bulbs are dimmable, so this could help to mitigate the intensity for migraine sufferers. 

If you suffer from migraines, you should pay attention to your light exposure to look for trigger patterns. 

LED bulbs are energy efficient, bright, and widely available, but they’re still considered “new” in the lighting industry. It’s always a good idea to keep an ear to the ground for future breakthroughs and discoveries.  

If you have any questions about how to use LED bulbs in your home, or how to choose the right light bulb for your space, our lighting experts are ready to answer your questions. Give us a call or drop in and see us at our showroom!

The information in this article is compiled from several sources and studies. Research into the effects of LED lights on your health is ongoing and subject to change as new information is found. If you have any concerns about your health and its relation to LED lighting, please consult a licensed medical expert.

Filed Under: 2021, Healthy Lighting, Informational, LED Lights, Sleep, Wellness & Safety

Next Page »

Copyright © 2025