• Skip to primary navigation
  • Skip to main content

Illuminations

  • Buying Guides
  • Styles & Trends
    • Bathroom Lights
    • Ceiling Fans
    • Ceiling Lights
    • Lamps
    • LED Lights
    • Outdoor Lights
    • Smart Lights
    • Wall Lights
  • Wellness & Safety
  • Shop Products

admin

How to Safely Replace A Ceiling Light

How to Safely Replace A Ceiling Light

by admin · Feb 19, 2023

Ceiling lights are a must-have feature in any room. Whether you don’t like the previous homeowner’s taste or you’re just ready for an update, ceiling lights can revitalize your home space. It may be even easier than you think–just follow these steps to safely switch out those old light fixtures for a new look.

What you’ll need:

  • Screwdriver
  • Step ladder
  • Voltage detector 

You may also need:

  • Wire cutters
  • Wire strippers
  • Pliers
  • Painter’s tape
  • An extra set of hands 

Part 1: Remove Old Fixture

Step 1: Turn off power

Shutting off the electricity is important to your safety. Locate the switchboard for the room you are working in and flip the switch. If you’re not sure where the switchboard is, check the basement or garage. It might also be in the front of the house or near the entrance.

Once you’ve flipped the switch for the room with the ceiling light, go back into the room and flip the switch a few times to make sure the power is off. Then, leave the light switch in the off position. Make sure you lock the circuit box or leave a note indicating that you are working. 

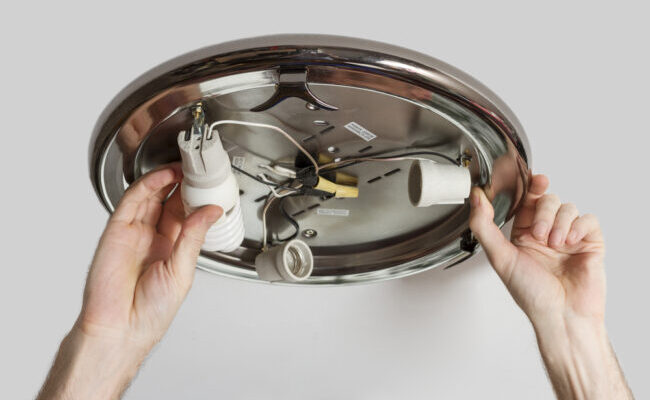
Step 2: Remove cover and bulbs

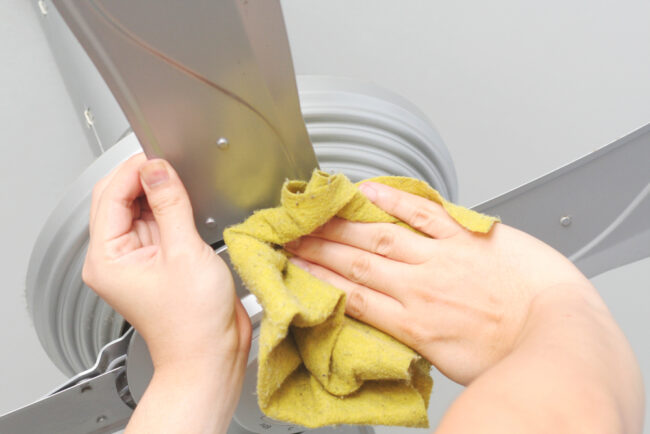
Use a stable step ladder to reach your ceiling light. Hold the cover, or the visible, outside piece of the light fixture, in place with one hand. Loosen the screws with a screwdriver in the other. (For heavy or large fixtures, it’s best to have someone else hold on while you work on the screws.

Once the cover is removed, unscrew the light bulbs and set them aside.

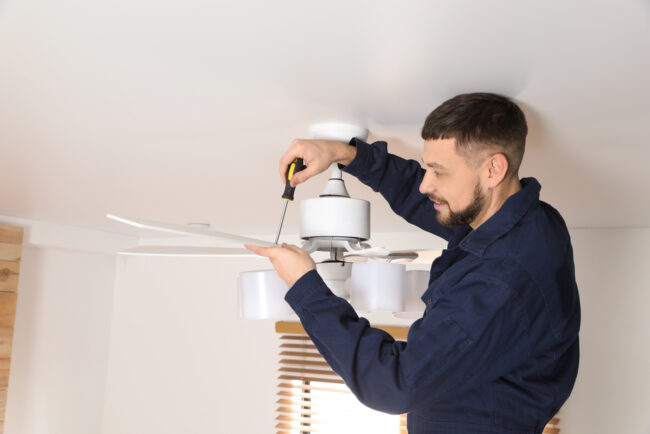
Step 3: Lower the fixture base

With the cover removed, you will be able to see the base–the part of the light fixture that attaches directly to the ceiling. Typically, the base will have tabs or nuts and screws securing it. Loosen the nuts or screws, then lower the base to access the wiring (In the rare case you’re unable to find the screws, search for the installation manual online. You can also take a picture of your base and bring it into our showroom – we’ll take a look and help you figure it out!)

Until you have disconnected the wiring, you will want to lower the base but not remove it completely—an easy way to do this is by securing it with painter’s tape or having someone else hold it in place.

Step 4: Disconnect the wires

Once you have uncovered the space behind the old light fixture, there should be a junction box where wires are connected and stored. Start by removing the caps or tape covering the wire connections. The caps will come off when twisted counterclockwise.

 Pro Tip: Take a picture beforehand so you can remember exactly how everything was put together. 

Part 2: Connect the Wiring

Step 1: Test voltage

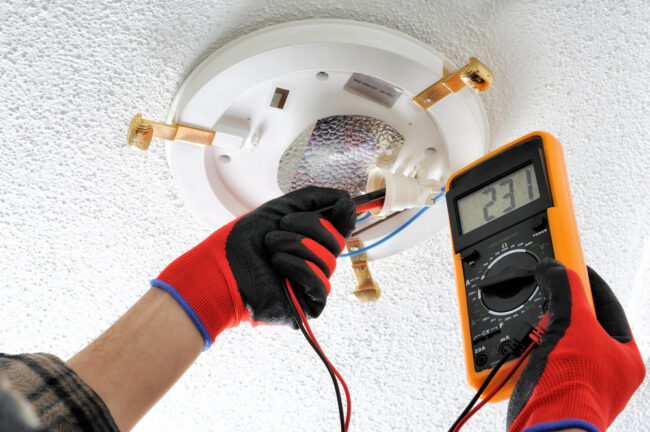
Test each exposed wire by touching it with the tip of your voltage detector. 

If the voltage detector lights up, there is a current running through, and the wire is unsafe to touch. Double-check your circuit box and ensure the switch is still flipped. 

Once you’re sure there is no electrical current, you are safe to continue working with the wires.

Untangle the wires and detach the fixture from the ceiling completely. Either hand off to someone below or carefully carry it down the ladder.

Step 2: Check wires

Frayed wires can be hazardous -if there is any fraying on the end of the wires, trim them down with wire cutters. Then, strip off any insulation on the outside with wire strippers. You only need to strip about ½ inch of insulation for the wire connection.

Pro Tip: Check your new fixture’s installation recommendations carefully. If you’re installing a heavy fixture such as a ceiling fan or chandelier, you may also need to install an additional support in the ceiling. 

Step 3: Match and Attach

Electrical wires are color-coded. Black or red are hot wires, white is neutral, and green or bare copper are ground wires. A grounding wire sometimes connects to a grounding screw instead of another wire. Look for a matching wire in your ceiling for each wire in your fixture.

Twist together each matching wire. Either by hand or with pliers, hold the exposed ends side by side with one hand and twist with the other. (This is where your picture of the original fixture’s wiring comes in handy.)

Now that the wires are connected, it’s important to cover the exposed ends again. Screw the wire caps on by twisting clockwise over the connected ends until they hold the wires tightly in place. If your original fixture didn’t have wire caps, you can use electrical tape as well.

Make sure to check the owner’s manual for specific instructions—for example, you might have an extra red wire that connects to a black wire. If you don’t have any instructions, generally you will be fine with just matching the correct wire colors.

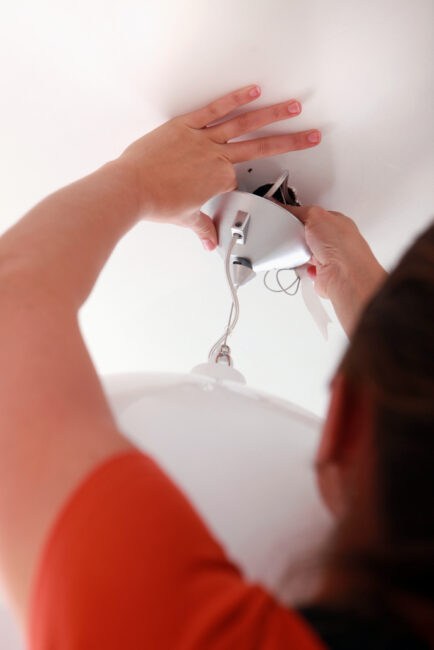
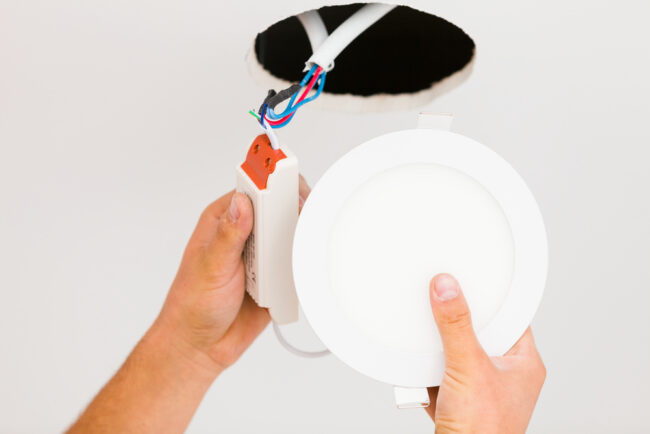
Part 3: Install New Fixture

Step 1: Replace junction box

With all your wiring safe and sound, the junction box is ready to be put back into place. Tighten the screws securely against the bracket until  Fold the wires up into the box so they will be hidden behind the ceiling light.

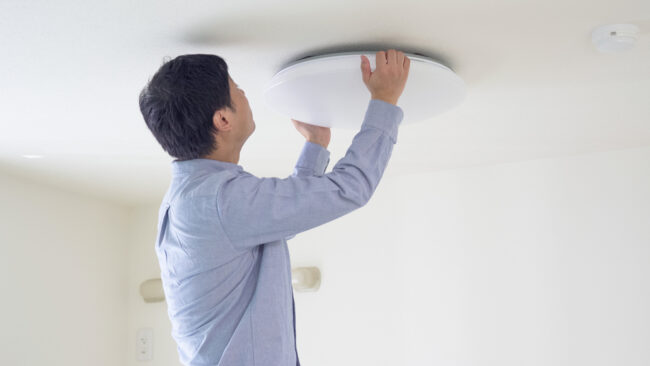
Step 2: Attach new fixture

There are several different ways your new light fixture base could attach to the ceiling—these are the most common ways. As always, check the owner’s manual for anything specific or unique about your light.

Securely attach the light base by positioning it over the mounting screws. Place a metal nut on each screw and twist by hand until they are tightly holding the base in place.

If the fixture has a mounting bracket, connect the mounting bracket to the junction box first, then hang the base over the screws.

If it’s a keyhole shape, adjust the base so the screws slide into the smaller grooves and then tighten the screws with a screwdriver until they are holding the base securely.

Step 3: Install light bulbs

Now that your base is set, it’s time to add the light bulbs. Make sure you have the correct wattage—the fixture typically indicates its maximum wattage on the package or owner’s manual. 

When choosing which bulbs to use, the lower the wattage the safer. Most light fixtures are safe with up to 60 watt incandescent bulbs. You may also want to consider more eco-friendly choices, such as CFL or LED bulbs. These options have lower wattage but produce the same amount of lighting, saving you money on electricity in the long run.  

Test the bulbs by turning the electricity back on—flip the switch on the circuit breaker then turn on the room light switch. If it is flickering, dim, or not turning on at all, turn the electricity off again and check everything—look for loose connections or mismatched wires. If your lights are bright and solid, you are ready for the final step.

Step 5: Attach cover

Flip the light switch and circuit breaker back off before installing anything else. Take your light fixture’s shade, cover, or top and climb back up the ladder. Attach it to the base by twisting screws or attaching pieces until everything is tight and secure. If it’s a hanging light, make sure it’s at the proper height before finishing your work. Every light has different connecting components, so check your owner’s manual and just make sure it’s snug.

And there you have it, your guide for installing a new, updated ceiling light. Now that you know how to install it, make sure to visit our showroom to choose the perfect fixture for your ceiling!

Filed Under: 2023, Buying Guides, Ceiling Lights, Styles and Trends, Wellness & Safety

Contractors: 6 Reasons You Should Ditch the Hardware Store Lighting Aisle

Contractors: 6 Reasons You Should Ditch the Hardware Store Lighting Aisle

by admin · Feb 13, 2023

Contractors: 6 Reasons You Should Ditch the Hardware Store Lighting Aisle: How Sourcing from a Lighting Showroom is Better for Your Business

While the pressure and prices in the housing market continue to rise due to supply chain shortages and increased demand, all businesses are looking for ways to get the best value for their dollar. This is especially true for contractors and builders, who are working harder than ever. 

If you’re still relying on big-box stores to light your projects, you’re probably missing out on a lot. Lighting showrooms offer better service, quality, expertise, and selection that big-box stores just can’t shine a light to. 

We know your time is valuable, but we can guarantee it’s worth your time to look into what showrooms have to offer before you go out shopping for your next project.

1. Fair Prices 

We know the bottom dollar is important on your projects, and lighting is often one of the last steps on the list when the budget is getting thin. 

It’s a common misconception that lighting showrooms charge more for their fixtures than you’d pay at a chain retail store – but it’s just not true. In fact, some big-box stores are notorious for marking up fixtures and then offering occasional “deals” that aren’t really deals at all. 

You cat trust that the prices you see at a lighting showroom are transparent and fair. And if you pay attention, you’ll notice that the prices at a showroom are comparable across the board for similar products you’d find anywhere else. 

If the prices aren’t that different – then you might as well be taking advantage of all of the extra benefits that come with shopping at a lighting showroom. Such as:

2. Better Value

Showroom owners are a lot pickier than online retailers and megastores about what they sell. Those comparable fixtures you’re price checking? They’ll often be higher quality versions – which means you are less likely to have your clients calling you in 2 months with a complaint. 

In addition to the overall higher quality, showrooms also give you more than your money’s worth in other ways not directly tied to your costs – like better warrantees and extended customer support.

3. Huge Selection

Lighting showrooms specialize in just one thing – quality lighting. With the entire store dedicated to showcasing fixtures and bulbs, you’ll be able to see how the fixtures look up close and check installation guidelines before making any purchases. 

If you or your client is looking for something specific, showrooms also have access to a massive selection of fixtures through the manufacturer catalogs. If it’s not on the floor, we’ll be able to find it and get it ordered for you. You’ll be able to find exactly what you need without having to shop around. 

4. Expert Advice and Speciality Knowledge

When you walk into a national chain hardware store and need help, you already know that the employees there usually know a little bit about plumbing, electrical, appliances, and lighting, but they likely won’t have deep knowledge about any of them.

Lighting showroom staff are experts in lighting. Their services center around helping contractors get the right products into their builds. The experts at our lighting showroom stay up to date on the industry and can give you expert advice you wouldn’t find anywhere else. You don’t need to spend hours researching and comparison shopping – we’re more than happy to share what we know to help you get exactly what you need.

5. Word of Mouth

Your reputation matters – and nothing is more valuable to a business owner than a glowing recommendation from a happy client. Sometimes lighting is an afterthought for your clients who are more focused on finishes and fixtures. But even a brand new space with high-quality craftsmanship will look underwhelming with poor lighting. 

Our lighting experts can help you make sure that your clients get quality fixtures that will highlight your hard work. This will result in two things: 1. Happy customers that want to refer you and 2. Jaw-dropped friends and family that want to ask for your number for their next project.

Another thing to consider – homeowners often come windowshopping at lighting showrooms to pick out what they want “when they’re ready” to start a renovation. If your local lighting showroom knows who you are and sees you regularly, they can refer you to their customers to help them get started.  

6. Industry Relationships Matter 

Developing relationships in the industry is vital for all of us. You’re not receipt #238942, you’re a local business owner, part of our community, and a friend. 

When we know who you are and what you like, it makes it easy for us to help you get in, get out, and get what you need quickly so that you can spend your time on other parts of your project.

In addition, most showrooms allow contractors to set up an account – which often comes with perks such as discounted prices, bulk ordering options, and payment plans. 

If you’re still relying on big-box stores for your lighting needs, it’s probably time to consider your options and visit a lighting showroom to see what you’re missing. 

If you’re in our area, stop by Illuminations – we’d love to get to know you and see how we can help your business grow.


Filed Under: 2022

7 Ways to Glow Up Your Pool: Lighting Tips from Lighting Experts

7 Ways to Glow Up Your Pool: Lighting Tips from Lighting Experts

by admin · Feb 13, 2023

Having a pool in your backyard is an incredible luxury. But what takes a nice pool to a jaw-dropping show-stopper is excellent light scaping. So if you’re prepping for a high-impact pool renovation, your lighting is sure to give you the luxury factor you’re looking for!

Great lighting highlights your pool features and turns them into a breath-taking statement even when you’re inside. And it extends your pool party to after-dark!

But great pool lighting can be very different from landscape or interior lighting. That’s because pool lighting requires a lot of finesse, keeping glare to a minimum. So we’ve compiled seven tips to help you keep your pool area bright, luxurious, and inviting.

Let’s dive in!

Moonlighting– General Lighting Without Glare

There’s not much that’s better than a swim in the moonlight. Unfortunately, you can’t always count on a full moon and a cloudless sky, so a lighting technique called moonlighting is the next best thing. 

Moonlighting uses an elevated light source that softly concentrates light downwards– basically, it mimics the moon! It creates soft, ambient lighting without a harsh glare on your eyes or reflecting too much light off the water. And there’s no denying that moonlighting will bring your pool from basic to luxury!

Expert Tips:

  • When you can, tuck moonlighting fixtures away in trees or your roof to make it feel more like natural moonlight.
  • Use warmer, more yellow light to keep the pool area a relaxing space. Bright white lights are more likely to create a harsh glare.
  • The size of your pool deck will determine how many lights you’ll need to get the glow just right. If you’re unsure how many you need, it’s better not to guess. Too many, or too few, won’t create the illusion. Before you buy, contact a local lighting showroom to get expert advice on your yard’s unique dimensions and needs. 

Light the Water

Another great way to gently increase visibility is to light up the water in your pool. A bright pool makes it easy to swim or chat on the deck without disrupting the mood. So put lighting the water on the top of your pool upgrade list!

Expert Tips:

  • Always use underwater-grade lighting. Electrical safety is critical when you’re around water, so make sure you get the right bulbs.
  • Proper placement matters. Keep the lights relatively close to the water’s surface, spaced at least 3-4 feet apart. It’s easy to overdo it with underwatering lighting, so remember – the fewer bulbs, the better.
  • Lighting an existing pool? Unfortunately, installing underwater lights in an existing pool is pretty difficult. Your best bet is to contact a pool installation expert to see what it will take to get your pool equipped with underwater lighting.

Keep Stairs and Walkways Safe

Your pool renovation has to keep the surrounding area in mind. Whether entertaining or playing with your family, safety is always a top concern. So always keep walkways, steps, and pool borders clearly defined and visible. The good news is, you don’t have to sacrifice style to be safe! 

Expert Tips:

  • Tuck lights under the stairs to hide the light source and reduce glare. You can also light your stairs from the side with stylish fixtures that create visual interest while lighting the way.
  • Use reflective materials around the sides of your pool to highlight the edges so they’ll catch the light without having to shine light upwards.
  • Solar lamps are an excellent option for lighting walkways. They’re very low-maintenance and come in an almost endless variety of styles.

Highlight Water Features

A waterfall or fountain brings a home pool from a fun time to a luxurious experience. But the magic shouldn’t stop after sundown! Lighting your water feature will upgrade it to an around-the-clock art experience.

Expert Tips:

  • Color-changing LEDs help to match the mood and keep your water feature flexible. Check the packaging to ensure they’re safe for outdoor use and have color-changing capabilities.
  • Tuck light sources behind or underneath the stream to light the way. You’ll need water-grade lighting for a safe light show.
  • Highlight the fountain or waterfall architecture to complete the experience. While these lights may not be underwater, you’ll still want to make sure they can handle the strain of the elements in your climate.

Make Landscaping Pop

Your home landscaping plays a vital role in every swim, day or night! So play up your trees, shrubs, and flowers in your pool renovation with a few of these lighting tips.

Expert Tips:

  • Silhouetting uses a ground light source behind a row of shrubbery to create a shadowy effect on a wall behind them.
  • Highlighting also uses a ground light source but shines in front of trees or other plants to make them look like they’re glowing.
  • Hang fairy or string lights around or between trees for a soft, enchanting touch. Plus, these are easy to hang yourself and take down for the off-season.

Bring in Island Vibes

Want to bring a piece of island living to your backyard? A few careful lighting tricks can land your home beach bash in a true paradise. And it may be easier than you think to pull off this luxury pool vibe!

Expert Tips:

  • Nothing says exotic like firey displays. So use tiki torches or a feature firepit to heat up the party!
  • Color-changing LED accent lighting transports your party anytime! Bring in island blues, pinks, and greens with a touch of a button.
  • Use highlighting techniques to bring your tropical trees and flowers into the experience.

Brighten Surrounding Architecture

Your pool may be the center of your backyard entertainment– but the surrounding architecture of your home, gazebo, or pool house is the backdrop. Don’t let your unique architecture go to waste when the lights go out. So pull the rest of your home into the pool experience with your pool upgrade!

Expert Tips:

  • Highlight arches and beams to show off beautiful architecture around the clock. You can install small spotlights, use recessed lighting, or play with string lights for a custom look.
  • Downlighting or Uplighting? You can position accent lights to shine down walls or use ground lighting to literally light up your home exterior.
  • Brighten doorways. Direct guests and family members to the right places with beautiful sconces or spotlights.

Need Help?

Proper lighting is essential to a fully functioning home– but it can be challenging to nail balanced brightness, great fixtures, and a budget! Contact the experts at Illuminations for advice on your project!


Keywords: pool renovation, upgrade your pool, luxury pool

Filed Under: 2023, Outdoor Lights, Styles & Trends

3 Ways to Layer Light and Level Up Your Interior Design

3 Ways to Layer Light and Level Up Your Interior Design

by admin · Feb 9, 2023

Have you ever been to a friend’s house whose home has that X factor? Something that made it seem really inviting even if their decor wasn’t notably upscale? That friend probably had great lighting.

Color, shape, and texture are the building blocks of interior design–but lighting dictates how everything comes together. So, what goes into a well-lit room? Design experts recommend having 5-7 different light sources in any space. These “layers” of light make it so that you can customize the mood, function, and comfort level of a room depending on how you’re using it.

There are three basic layers of lighting to consider: ambient, accent, and task lighting.

Read on to see how these layers of light work– we’ll show you exactly how things like location, bulb choice, and design combine to give you the perfect lightscape. Then the ball’s in your court! Working layer by layer, and with just a little bit of insider lighting know-how, it’s easy to give your home that X factor too– without having to replace a single decorative pillow.

Layer One: Ambient Lighting

The most basic level of lighting for any room is ambient lighting. Ambient lighting is the light that fills the room, casting an even glow from overhead. In most homes, this will come from a central flush mount (often the dreaded “boob” light), a ceiling fan and light combo, or can recessed lights.

Let’s dive into top considerations to creating great ambient lighting.

Location

If you are using one large light as your ambient light source, keep it central with maximum light flow. It’s usually a good idea to use a glass covering instead of metal or wicker shades to avoid creating shadows.

If you want to create ambient light with a grid of recessed lights instead, spacing is critical. An easy trick to determine how far apart your recessed lights should be is to divide the height of the ceiling by 2. For example: For 8-foot ceilings, divide 8 by 2 (8÷2=4) – consider staggering your can lights about 4 feet apart for optimal lighting.

Pro Tip: This formula will get you started, but there’s a lot to consider if you’re installing a new grid of recessed lights in your home. The size and trim can vary greatly, which will have a big impact on light coverage– and you need to take the shape and layout of your room into account. If you want help getting your recessed lights spaced correctly, stop by our showroom and check in with one of our lighting specialists!

Bulb Choice

Each room of your home will have different bulb requirements. For your kitchen, bathroom, and office, lean into brighter, cool light. These bulbs will activate your brain for better concentration and focus. Look for bulbs that say “bright white” or “daylight” on the packaging.


On the other hand, bedrooms and living rooms are usually dimmer and warmer to encourage relaxation. These bulbs will say things like “soft white” or “warm white” on their box.

Design Tips

While there’s not necessarily a one-size-fits-all solution, great ambient lighting will completely transform the way your room feels. Here are a few tips that will translate across most rooms and decor styles:

  1. Consider replacing the standard “boob” lights. While they’re great at lighting a space, the shape of these lights can sometimes feel boring or dated. Don’t be afraid to get creative– there are so many other options available!
  2. Play with paint colors: the color and tone of your walls have a big impact on how the ambient light reflects. Check your paint samples at different times of the day to see how they look with both daylight and your light fixtures. 
  3. Think about going bigger! If a flush-mount fixture feels underwhelming, take a look at other options like ceiling fans or pendant lights. Chandeliers are also making a comeback– they’re not just for vintage vibes! You can play up crystal delicacy for a soft touch in a modern room or branch out with wood beads or other designs.

Pro tip: If you’re planning on replacing your ceiling fixture yourself, make sure your new light is properly supported. You might need to install a sturdier electrical box to support the extra weight of a larger fixture– just check the installation guide before you get started!

Layer Two: Task Lighting

The next layer of your lightscape is task lighting. Task lighting shines extra light on a space to make doing a specific task easier and/or safer. It’s especially helpful for tasks that involve working with small objects, like sewing, or that require concentration, like reading.

Location

You need task lighting anywhere you are performing detailed work. Your home likely already has some task lights installed in common places, such as a bright wall sconce over the bathroom mirror where you get ready, and pendants or recessed lights above a kitchen counter. 

Lamps are the real MVP of task lighting, because they can go anywhere you can run a cord. You’ll find them sitting on a desk, in the garage over a workbench, illuminating the music on a piano, next to a cozy reading nook, on the bedside table, and more. 

Bulb Choice

Task lighting usually uses bright white light to get the best view and activate the attention centers of your brain. There are a few exceptions, however. If you’re lighting a reading nook or a bedroom you’ll want softer and/or warmer light to get that cozy comfort.

Design Tips

Even though task lighting is “task-oriented,” it doesn’t need to be 100% utilitarian. Here are a few ways to think about making your task lighting both beautiful and functional:

  1. When possible, work with odd numbers of light– it will feel more organic. For example, 3 or 5 pendant lights will look usually better over a kitchen counter than 4. 
  2. Experiment with different materials for lampshades. A glass shade will maximize the glow, woven shades will give a light filtering effect that softens the light, and opaque shades will concentrate the light. You can completely transform the way a lamp or pendant lights your space with a simple shade swap! 
  3. Don’t forget your bathroom vanity! Most vanities have a light above the mirror– but that’s not necessarily the best placement for getting ready. Face-level light on either side of your mirror is best for doing things like applying makeup.

Pro tip: Did you know that LED light is widely considered the best lighting for applying makeup? It’s the closest to natural daylight! Try a backlit mirror or LED strips at facelevel to see your makeup’s true colors.

Layer Three: Accent Lighting

Accent lighting is the fun layer– it leans much more into design than function. The purpose of accent lighting is to create a mood, or to highlight a specific feature in a room like an architectural detail or a piece of art. 

Location

Unlike ambient or task lighting, accent lighting doesn’t have a simple rule for best placement. Whether it’s hanging from the ceiling, sitting on a shelf, or standing on the floor, accent lighting can come from anywhere and shine on anything. 

One way to determine where you need accent lighting is by thinking about your favorite evening activities. For example, where do you and your family cuddle for movie night or bedtime stories? Turn off your ambient lighting and see where you need a lamp, some sconces, or LED strips.

Pro tip: Plan on having 2-3 sources of accent light per room.

Bulb Choice

Accent lighting that’s highlighting a feature is typically small and bright. For accent lighting that’s creating a mood, look for dimmable options. Either way, you’ll need warm bulbs to achieve a cozy glow! Look for bulbs that say “soft white” for the gentlest light, with “warm white” as a close second. 

Accent lighting opens the door for you to get creative! Check out some color-changing smart bulbs or LED strips that can really change the way your room feels with just the touch of a button!

Design Tips

Accent lighting is very specific to a person and their space, so there aren’t any hard-and-fast rules. Here are a few ideas to get your imagination flowing:

  1. Fill in the blank: if you’re missing a color or texture in your room, try bringing it in with an accent lamp. Warm up a modern space with a wooden or stone lamp, or balance your color palette with a new lampshade. 
  2. Choose the unexpected: use sconces and pendants where you’d normally place a lamp. For example, if you have a couch tucked into a corner that could use more light, save floor space by hanging a pendant above the seat.
  3. Track lighting isn’t just about the lights– it can elevate your room by highlighting other decor and collections! Try placing them above your gallery wall to elevate your wall to an art museum experience. 

Pro tip: Renting or want to avoid hiring an electrician? You can still use pendants and sconces! There are special varieties that use a plug– no hardwiring required. 

Ready to Customize Your Lightscape?

Now that you have the guiding principles ready, the possibilities are endless! If you’re ready to get serious about your home’s lighting and design, the experts at Illuminations can help you connect to a showroom near you. Contact us today!

Filed Under: 2023, Styles & Trends

9 Ways to Upgrade Your Home with LEDs

9 Ways to Upgrade Your Home with LEDs

by admin · Feb 7, 2023

With their excellent energy efficiency, affordable price tags, and numerous customized options, LED light bulbs are quickly becoming the top choice for home lighting. Available in small bulbs and flexible strips, these microchip-powered wonders fill almost every need in your home– including some you didn’t even know you had!

So get ready to upgrade your home’s functionality and style! Here are nine ways using LED bulbs in your home can improve your home’s design, costs, comfort, and safety.  

1. Energy Efficient

LEDs are highly energy-efficient light sources because they create light with a microchip. With no gas or burning filament, they waste far less energy in heat production (not to mention much better customization in color, brightness, and temperature. But we’ll get to that later!) 

Unlike older bulbs, LED bulb packaging uses lumens instead of watts to tell you how bright they are. Watts measured the electricity needed for incandescent bulbs to glow, but lumens directly measure the amount of light a bulb gives off. The higher the lumens, the brighter the bulb.

But it’s not just the packaging that’s changed– your utility bill will decrease when you replace incandescent bulbs with LEDs. They use far less energy than incandescent bulbs to give off the same level of light, savings you’ll actually be able to see. 

2. Work with Most Light Fixtures

No matter your light fixture, there’s likely an LED bulb that’s a perfect match. LEDs come in a wide variety of standard-sized bulb sizes and shapes– so you can even use them in your candelabra chandelier! 

The only thing to watch out for is ventilation. LEDs are cool bulbs compared to incandescent and other traditional options, but they’re not entirely immune to overheating. So if you’re ever in doubt, give a local lighting expert a call and they’ll help you find the correct bulb.

3. Safer than Other Bulbs

LED bulbs are one of the safest ways to light your home– they produce minimal heat and use very little energy. They’re even safer than fluorescent bulbs, a top competitor for energy-saving lighting. Compact fluorescent bulbs, or CFLs, glow by passing an electrical current through mercury gas. So CFLs are a little risky in “accident-prone homes,” like homes with pets or small children.

On the other hand, LEDs glow using a microchip. In fact, LEDs don’t even need to use the glass bulb case– they’d be just as safe and contained without it! So if you want to increase your home safety while still being energy efficient, swap out your CFLs for LEDs.

4. Best Color Rendering Index (CRI)

Did you know that the way you see color depends heavily on the type of light shining on it? Stores and online product photos use great lighting to show their products at their best potential. But if you bring those products home in poor lighting, you may be surprised to find that it doesn’t look as great as they did before. It’s not always buyer’s remorse, though– sometimes it’s just bad lighting!

LEDs are one of the best on the color rendering index (CRI), meaning they show colors more accurately. Their light will be very close to the lighting in-store or in the product images, so it’s much more likely to look the same in your home as it did in the cart.

As a bonus, high CRI lighting is a huge help in places like your bathroom or closet. Accurate lighting can help you pick the right clothes and do your best makeup. No more surprises when you see yourself in the office mirror!

5. Dimmable

Dimmable bulbs are perfect for rooms with multiple functions. Take your living room, for example– during the day, you’ll want bright light as you move about your daily activities and tasks. But in the evening, you want your living room to be a soft, cozy space where you can relax and unwind. 

LEDs can come with dimmable capabilities, making them perfect solutions for bathrooms and bedrooms. They will also work with your existing dimmer switches and remotes. So simply swap out your old bulb, and you’re ready for a day-to-night lighting experience!

6. Vary in Temperature

A bulb’s light temperature refers to whether the light falls into cool (blue) or warm (red) light. Cool, blue light is in the same range as direct sunlight– it wakes you up and gets you focused. Warm light is similar to fire and candlelight and helps you to relax. Traditional bulbs were all warm light, but modern LEDs come in a wide variety of light temperatures.

How will knowing this improve your home, you ask? Our bodies work with a circadian rhythm– the natural cues to wake up with the sunrise and relax at sunset. But our modern life surrounds us with blue light well after sunset, eliminating the natural transition to red light before sleep. Choosing the right LED bulbs makes it easy to reintroduce the red light phase to your circadian rhythm. 

Opt for warm light bulbs in places where you relax at the end of the day (dining room, living room, bedroom, etc.), and it’ll help signal to your brain that it’s time to go to bed– making it easier to fall asleep at bedtime. Just don’t undo your brain’s relaxation by staring at your phone screen in bed afterward!

7. Smart Integrations

What’s a smart home without smart lighting? LED bulbs are a top smart home choice because they offer a wide range of stress-free customization.

This flexibility makes them a great choice to use on their own, but they’re also great options to use with your smart home setup. Set routines for lights to turn on and off and control settings from your phone on the go!

You can even create a habit with your smart home assistant to ”warm up” the temperature of your LEDs a few hours before bed. It’s a simple change that could significantly help your family rest better– and avoid the increased risk of depression, anxiety, and weight gain connected to regular poor sleep.

Remember, not every LED bulb is “smart,” so make sure you read the packaging to get the perfect addition to your smart setup!

8. Customize Color

LED stands for “light emitting diode”– big words to describe a glow from passing electricity through a microchip. Because of the way they work, many LED bulbs can change color, temperature, and brightness with the press of a button.

Color customization may seem like a party trick with little functional use. And while they are a great novelty at parties, color-changing lights can also help you wind down at night and reduce eye strain when watching TV or sitting in front of a computer monitor.

LEDs are excellent for creating bias lighting for your TV or computer. Bias lighting casts light on the wall surrounding your screen to help decrease the intensity of the image, making it easier on your eyes. It also increases the contrast of your screen, so you’ll get a better view without upgrading your tech!

9. Strip Lighting

A lesser-known use for LED lights in the home is strip lights. If you’re looking to make your home look and feel like a bespoke model home, these are the way to go. The best part– they’re inexpensive and simple to install. 

LED strip lights can be wired to a switch, but homeowners often opt for battery-powered or plug-in options for noninvasive installation. They typically come with either a remote or smart home integration capabilities. They’re also tiny, and since many come in a user-friendly peel-and-stick variety, they’ll fit just about anywhere! 

We recommend trying out LED strip lights in places like:

  • Kitchen Cabinets: Stash these inconspicuously under cabinets to make dinner prep easier and safer, or add them inside glass-fronted cabinets to turn your dishes into art! You can also place them under the toe-kick to light those late-night snack runs.
  • Stairways: Make your evening bathroom trip safer by lining your stairs with light. Don’t want to see them? Try tucking them underneath the handrail!
  • Closets and Shelves: Want to turn your dark closet into an elegant dressing room? LED strip lighting will elevate your closet without any structural changes. Add them to the top of shelves, above your shoes, or around the top edges of your walls – they’ll go anywhere you need more light.
  • Bedroom Mood Lighting: String a few LEDs around your walls and change the color  or brightness of your entire room without lifting a paintbrush– a very popular DIY for teenagers and social media creators
  • Bathroom GlowUp: Stash a few LEDs under bathroom cabinets for a toe-kick touch of luxury and soft lighting. Or use around your mirrors for true lighting during your daily skincare routine!

The Possibilities are Endless

LED bulbs and strips are small, easy to install, and can fit just about anywhere. Whether you’re swapping out all of your home’s bulbs or just adding custom lighting to your favorite spaces, LEDs can give you that luxury feel without breaking the bank. And when you factor in their energy efficiency, customization applications, health benefits, and smart home applications, it’s easy to see why LED bulbs are the swiss army knife for home lighting needs.

Proper lighting is essential to a fully functioning home– but it can be challenging to nail the balance between light levels, fixture designs, and a budget! For your next project, contact the experts at Illuminations.

Filed Under: 2023, LED, LED Lights, Styles & Trends

How to Fix a Noisy Ceiling Fan

How to Fix a Noisy Ceiling Fan

by admin · Feb 7, 2023

Ceiling fans can change your life – or at the very least your outlook on life – with just a flip of the switch on a hot, stuffy, muggy day. There’s something magical about the way they can change the entire way a room feels, making it comfortable in seconds. 

But what happens when this miracle-worker of a ceiling fixture starts affecting the ambiance in ways it shouldn’t? A noisy, squeaky ceiling fan will make the room it’s in unbearable no matter the temperature. If your noisy ceiling fan is making you miserable, it might be easier to fix than you realize. With just a little investigation and willingness to tinker, you could be on your way to cooler days ahead. 

There are a number of reasons your fan may be making more noise than it should – we’ll go over some of the most common issues and what you can do to bring back the peace and quiet.

1. Problem: Dirt

Just like every other surface of your home, your ceiling fan collects dust over time. This is especially true if your fan sits idle over the winter months, but even a fan that’s on 24/7 will get dirty over time. 

Take a damp rag and wipe down your ceiling fan, starting from the top. Be sure to wipe all sides and edges of the blades. If dirt was the culprit, you’ll notice right away that your fan is quieter once you’re done. 

2. Problem: Damaged Blades

Over time, some fan blades may warp. This is especially true for fans that have blades made of cheap composite materials, fans in humid environments, and extra-wide fans. Look at each blade from the side – each blade should be tilted at the same angle and lay flat. If you find a blade that is bent or wavy, it could be throwing off the balance of your fan, causing it to wobble.

If you can, carefully bend the blade back into shape. If it’s not fixable, you may be able to order a replacement blade from the manufacturer. 

3. Problem: Loose Parts

When your ceiling fan is in use there are a lot of moving parts, but if a part that shouldn’t be moving has come loose, you’ll hear a rattling sound. Thoroughly check your fan for loose screws. Common pieces that come loose include the canopy (the piece against the ceiling), the light kit (some fans may not have lights), and the fan blades.

Using a screwdriver, carefully tighten each screw you can find. Be careful not to over-tighten any screws, as it could damage your fan. If your fan has parts that snap into place, like a light cover, make sure those parts are seated properly. 

If you’ve checked all of the above and your fan still seems to be rattling or unstable, you may need to remove the canopy and double-check that the mounting screws attaching your fan to the ceiling are secure.

4. Problem: Grinding in the Motor

If the simple fixes above don’t resolve your noisy fan woes, it’s possible that the motor in your fan is running without sufficient oil. Ceiling fan motors and bearings need lubricant to run smoothly – without it, you may notice a sound that’s more like a buzz than a rattle. Each ceiling fan has different requirements for the proper way to add oil to the motor. We recommend checking your manufacturer’s user manual for specific instructions. 

If you’re not comfortable with taking your fan apart to get to the motor, this task might be a good place to bring in a professional.

Turning on your ceiling fan on a hot day should be a dream come true, not your worst nightmare. The good news is – most noisy ceiling fans can be fixed with nothing more than a thorough cleaning and a checkup with a screwdriver. In less than an hour you can be back to enjoying a blissful breeze in the comfort of your home.

If your fan is still making noise after you’ve checked for dirt, loose parts, and damaged blades, and oiled the motor, it might be time for a new, quality ceiling fan that can keep you cool for years to come. 

Before you go out and buy the first fan you see – stop by our showroom and ask around. Our lighting experts can help you find what you’re looking for, and we guarantee that our fans won’t start squeaking at the first sign of a heatwave!

Filed Under: 2023, Ceiling Fans, Ceilings Lights

6 Easy Ways to Increase Your Home Value

6 Easy Ways to Increase Your Home Value

by admin · Feb 6, 2023

As millennials flood the housing market, it might be a great time to think about how you can maximize your home value for sale now or in the future. How can you get the most bang for your buck, avoid never-ending renovations, and steer clear of overwhelming DIY projects? Here are six easy ways to increase your home value, each taking no more than a weekend.

1. Update Your Light Fixtures

It’s a simple and surprising effective fix: updated light fixtures can change the mood, first impression, and perceived value of any room (and can easily be done on a budget). Try a new ceiling light in your master bedroom and compliment it with trendy lights that frame the bed. Style up your kitchen with pendant lights, or consider some chic, industrial exposed bulbs. Your bathroom is also a great place to re-imagine your lighting to maximize the limited space.

mtlapcevic/Shutterstock.com

2. Stick with Neutral Paint

Be conscientious with your paint choices. Zillow’s 2018 Paint Color Analysis found that bright or custom colors can lower home value, so stick with neutral colors and use your decor (like artwork, flowers and plants, or textiles) to pull in brighter colors and personality. Greys, whites, tans, or simple wallpaper offer a wide range of possibilities for future home buyers, while still giving you room to create your perfect aesthetic.

Photographee.eu/Shutterstock.com

3. Add LED Strip Lighting under the Cabinets

Easily upgrade and brighten your kitchen with LED strip lighting. They’re easy to buy, apply, and use, and they come in varied colors, tones, and sizes. Under-cabinet lighting is especially effective in small spaces, make cramped kitchens look bigger by reflecting light off the walls. Add an air of luxury with a little extra LED light!

Ventura/Shutterstock.com

4. Invest in Smart Technology

Smart thermostats, light bulbs and appliances bring your home value to the next level. In fact, the Zillow 2019 Design Forecast predicted smart technology as one of the top requests from today’s home buyers. Most smart bulbs and appliances pair conveniently with AI assistants such as Alexa, Google Assistant and Siri. In addition, smart thermostats can decrease your home’s carbon footprint and slash your utility costs with their custom settings.

REDPIXEL.PL/Shutterstock.com

5. Power Wash your Home’s Exterior

A good wash can be as effective as a new coat of paint, and at a fraction of the cost. No need to buy the machine, either, since Home Depot and other hardware stores rent them for an hourly or daily rate. Wait for a sunny afternoon, grab a power washer, and enjoy the visible transformation of your home’s exterior.

ronstik/Shutterstock.com

6. Add Outdoor Lighting

Potential buyers will appreciate the visual appeal and safety benefits of outdoor lighting. Illuminate pathways with small, solar powered lights, or add a couple motion-activated spotlights for the driveway. Flood lights can eliminate the risk of break ins, and backyard string lights make hosting evening gatherings easier than ever. The options are endless and flexible to any budget, so pick an outdoor lighting project and let it boost your home value!

alexandre zveiger/Shutterstock.com

We know time and money are limited, but there are plenty of cheap, easy ways to increase the value of your home even in the most competitive market. Whether you add a fresh coat of neutral paint or install a few interesting light fixtures, you can make your home a place where you, and potential buyers, want to be. For advice about lighting or anything else, call our design experts at Illuminations.

Filed Under: 2021, Ceiling Lights, Styles & Trends

« Previous Page
Next Page »

Copyright © 2025